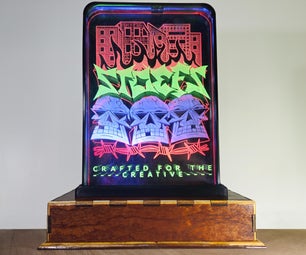
Introduction: Designing Your Own Desktop LED Neon Shapes in Fusion 360
Hello, I’m Lewis, and this is DIY Machines. A place where I get to show you step-by-step how to build 3D printable projects. In this Instructable, I'll step you through how to draw your own desktop neon signs in Fusion 360 for 3D printing.
The shapes you will design will work with the Neon sign project I recently published: https://www.instructables.com/Make-Your-Own-Customisable-Desktop-LED-Neon-Signs-/
The previous Instructable linked above dives into the electronic circuit and assembly. I was amazed with just how popular this project became and although I created plenty of ready made shapes and styles for you to use I received plenty of requests to explain how you can draw your own.
So sit tight, fire up your computer, and I’ll show you just how easy it to draw up your own design from a photograph or simple hand line drawing.
Step 1: Project Video
As I do with all my projects, I have created a video which partners perfectly with these written instructions. Feel free to pause here a moment whilst you look at the video (you can skim through it to get a sneaky peak overview of what we're about to cover in the following instructions).
Step 2: BOM (Supplies)
On the previous Instructable there is already BOM containing a list of what is required for the electronic circuits. Here I will only cover what is required to draw your own shape:
- Fusion 360
- Digital Camera (a phone camera is fine)
We will be drawing our shapes in Fusion 360 and there is a free tier for Fusion 360 which works on both Macs and Windows. Download using the link if you do not already have it installed: https://www.autodesk.co.uk/products/fusion-360/personal
Step 3: Preparing Fusion 360
Once installed you’ll want to download the starter project file. You'll find the file attached to this step of the Instructable. The file already contains the foot of the neon sign - that’s the bit which interfaces with the stand for the project.
Once the file has been downloaded you will need to upload it to Fusion.
- Click the file button then upload.
- Find the file which you just downloaded and choose a location in Fusion to upload it to.
When the upload is complete go ahead and open the file - You may need to press the message along the top to make the project editable if you are using the free tier.
Step 4: Capture a Reference Image
Let’s choose a new shape to create next. I suggest you either photograph an object, photo, or make a drawing on paper and photograph that.
I want to create a simple stylised light bulb. I’m going to draw mine on paper and then take a photo with my phone. I've included the photo I took so you can follow along if you wanted to.
Quick tip: To ensure you don’t draw something bigger then your 3d printer's print bed can accommodate - take your paper over to your printer and draw it on the printer's print surface.
You should also add two dot’s drawn 10cm apart onto the same sheet. This will help take care of scale later.
Send a copy of the photo to your computer and then dive back into Fusion 360.
Step 5: Setting the Canvas
We will insert the image as a canvas which will allow us to use the image as a reference whilst we trace the outline of the photo or drawing. Let’s call the part we pre-loaded into Fusion the ‘foot’. To add our canvas:
- Select the face on the rear of the foot. (Refer to the images above - the selected faces are show in blue).
- Choose 'Insert' and 'Canvas' from the menu bar at the top of Fusion.
- Upload the photo.
- Roughly resize for the time being so it's big enough to see and work with. We'll refine it shortly.
- We need to flip the image horizontally - to do this use the toggle in the menu pane on the right.
- Close the 'Edit Canvas' window pane by pressing 'OK'.
We can now set a more accurate size for our canvas.
- Right click on canvas image in the left side bar (inside the 'Canvas' folder) and select Calibrate.
- Click on the centre of each of the two dots and then enter the actual distance between them, for me it's 100mm.
We can then right click on the canvas item again, select 'Edit Canvas' and this time reposition it to better align with the foot.
Step 6: Begin Sketching
Let’s start drawing the shape, choose the rear face of the foot again and then start a New Sketch from the menu at the top. We’ll trace the centre line of the LED flex and then have Fusion create the thickness in the next step.
Using the line tool we can click at the start point. Clicking, releasing the mouse, and then clicking the next point will make a straight line between those two clicks. For a simple curve - click and hold the mouse button at the beginning of the curve and move your mouse to the end before releasing.
I can make use of the Line tool perfectly for the beginning of this shape.
At this point I’ll switch to the more curvy but not so catchy ‘Fit Point Spline’ tool. I can continue the same line and make points where the curve change direction of severity. I can then go back and grab the handles of these nodes to adjust the direction and influence of each point along the curve.
The outside width of our LED flex channel is going to be 7mm in width so we need to ensure that there is at least about 8mm between our lines. This is to ensure no parts of our drawing 'merge' together later. I’m going to use the ‘Sketch Dimension’ tool to ensure this by defining one dimensions on our sketch. Hover over the tool for some tips on using it but it boils down to:
- Selecting two features and then entering a required distance between them.
- Selecting one feature lets you specify its length or radius.
Step 7: Turning the Sketch Into a Solid
Now we can extrude our sketch. Go to ‘Create’ at the top and then choose ‘Extrude’. You can also press the 'E' key on your keyboard as a shortcut.
- Select the ‘Thin Feature’ type from the top of the menu and select your line drawing. This will create a solid extrusion along the line of the sketch we drew.
- Set the distance to '-13mm'
- Wall thickness to 7mm and wall location to 'Centre'
- Ensure that 'Operation' is also set to 'New Body'
Step 8: Creating the LEDs Channel
We’ll create the channel for LED strip using the shell command. This is found in the Modify menu bar at the top.
- Select the front face and set a value of 1mm.
- That's it. Easiest step yet! 🙂
Step 9: Adding Some Rigidity
To help support the weight of the print and LEDs we will increase the thickness of the rear face by 2mm.
- Simply click the rear face inside of the shell we just created.
- Select 'Extrude' (or press the 'E' key)
- Type 2mm.
We now have the rear of the print 3mm in thickness and the side walls are still 1mm thick.
Remember earlier we extruded the shape we drew 13mm? Well now our back of the model has eaten 3mm of this which leaves a 10mm recess for our LED flex to fit inside. This is the same as the spine of the LEDs and will leave just the rounded, coloured, and lit edge protruding. Perfect!
Step 10: Optional: Creating Paths for Wires
The light bulb design I'm creating will use just a single colour. If you want several colours and to be able to conceal power wires underneath the LED flex strips then we can create a small 'trough' that runs under the LED flex to contain the wires hidden from view.
If you're using just one length of LED, or will join each strip to the previous then you may skip this step.
- Select the bottom of the channel and create a new sketch.
- Choose the offset command and select the edge of the same bottom channel face we started the Sketch on.
- Set the position to 1.5mm and use the flip command from the side menu to ensure the lines are inside the channel edges and not the outside.
- Press 'OK' in the Offset menu window to complete the offset command.
- Use the extrude command to remove 1.5mm of material. (By typing -1.5mm and selecting the inside face the Offset command created)
Step 11: Connecting the Foot and Shape
To connect our shape to the foot at the bottom we will add a some material to act as a sort of backboard.
- Create a Sketch on the rear face of the foot again.
- This time select the 'Project' tool from the create menu (or use the keyboard shortcut 'P').
- Select the rear of both the foot and shape.
- Press OK.
This has created an outline of both the selected faces on our new Sketch. We can now continue adding to this Sketch.
You can then use the same Line and ‘Fit Point Spline’ tools we used earlier from the Sketch menu to draw out a suitable back board.
We can then Extrude the closed areas we want to make solid - choosing a thickness of -1.5mm. Minus because we want it to go towards the front face of the model.
Step 12: Tunnelling the Wires - Part 1
We will create the path for our electrical connection between the two parts in our model (the foot and your shape) and this will provide a tunnel for our wires to pass through.
- Select the top surface facing your shape on the foot and then select Extrude. (Shortcut 'E')
- Set the ‘Extent Type’ to ‘Object’ in the menu bar.
- Click the face of your LED path opposite it and press 'OK'.
Step 13: Tunnelling the Wires - Part 2
Now for the tunnel:
- Select the wall at the back of the starter tunnel inside the foot.
- Use the Extrude command as before and this time for our object we will select the inside of the LED channel.
- The Extrude command should automatically offer to cut through the model for you.
- Press OK.
Step 14: STL Export
Let’s export your design by expanding the 'Bodies' tab on the left hand side, right clicking on the body (there should only be one) and choosing 'Save as Mesh'.
This can then be sliced your slicer of choice and printed on your printer.
Step 15: Assemble the Project
Now all that's left to do is assemble the rest of the project. You can find detailed instructions for that in the projects first video (above) and in the separate Instructable article here: https://www.instructables.com/Make-Your-Own-Customisable-Desktop-LED-Neon-Signs-/
Step 16: Project Complete!
I love seeing what you create and how you adapt the projects I share so I strongly encourage you to upload a photo of your creation on Printables.com or here on Instructables.
Thank you so much for reading to the end. Please consider subscribing here and on Youtube. You can also support my project on Patreon: https://www.patreon.com/diymachines
Until the next project, take care, do some good and ciao for now!

Runner Up in the
Make it Glow Contest


![Tim's Mechanical Spider Leg [LU9685-20CU]](https://content.instructables.com/FFB/5R4I/LVKZ6G6R/FFB5R4ILVKZ6G6R.png?auto=webp&crop=1.2%3A1&frame=1&width=306)


