

Introduction: Hand Carved Door Pulls


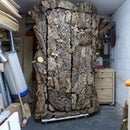
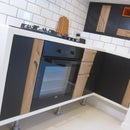

Part of the design for a kitchen I've recently finished building in my flat were door fronts featuring hand carved pulls. Each of the door fronts, 14 in total, received its own unique design of pull that was then combined with a veneered panel to create the final door/drawer front.
For the pulls I decided to go with American White Oak because it matches other furniture I have in the room and for the veneer, a contrasting Smoked Oak.
There's a video of the full kitchen build attached, the door section starts at 11:50.
Step 1: Tools

The pulls were shaped using a relatively small hand tool set that I've built up over the years:
- Measuring tools, pens, tape
- A No.4, a block and a shoulder plane
- Flat and convex spokeshave
- Gouges
- Chisels
- Rasps and files
- Cabinet scrapers
- Sandpaper
- Pull saw
And the only power tools being mitre/track saws to cut the timber to size and a drill with forstner bits.
Step 2: Marking Out the Design


I first worked out the dimensions the full doors would need to be then decided which orientation and proportions I wanted the door pull part for each to be. I could then cut the oak 'blanks' to the correct size.
With that, I first use a sharpie to mark out some guide lines I can reference when shaping, making sure to think about where best to place the finger pull recess so it would work with the direction the door was to open. I just made up the design of each pull as I went but you could always sketch out or 3D modell some design ideas before starting. And these are always just starting guides for me.. as I see the piece start to evolve in 3D it always changes slightly.
The majority of the dimensions/angles are just 'eyeballed' to what I think looks correct. For curved lines, I like to use tape as it allows me to try multiple times to get it looking right before marking it with the pen.
At this stage I also mark on some arrows and letters to show which direction I want the shapes to flow.. H=highpoint, L=lowpoint, F=flat etc.
Step 3: Quick Material Removal

I next like to quickly and easily get rid of as much material as I can. So for example, I need to get the areas where the recessed finger pulls will be dropped down.
This can be really roughly done as it'll get cleaned up with the gouges etc next. The two options I go for are a drill with forstner bit or a saw and chisel if there's access. When drilling down you need to be cautious of the depth, I always leave enough so I can use the gouges to get that area to the final depth I want. And also bare in mind the tip of the forstner bit and not where the hole cutting part starts!
Step 4: Carving


I then proceeded to start carving each pull into shape.
For my designs there were chamfered regions that I could use the planes on to get nice crips/flat surface. I like to start with the bigger No.4 plane to get the bulk of the material removed then refine it to final shape with a block plane which I have more control over.
The other regions were complex curved surfaces and under-hangs for the actual pull area. I would usual do most of the work with the wider gouge, taking small amounts of material away with each cut. For tighter areas I switched to the narrower gouge and for any longer sweeping curves that had access, the spokeshave. Rasps and files were also used to refine curves/transitions and begin to remove the gouge marks.
Step 5: Finish Shaping


After shaping the pieces are somewhat rough and had to be tidied up. For this I used curved cabinet scrapers that came in a set. Each one has different curves so I switched between them for the different areas of the pulls to get one that fit with the particular curve/access. Slowly I scraped material away until the surface was nice and smooth.
I was trying to keep each of the surfaces/facets nice and crisp; I found working with a light on a tripod best as I could move it around to create raking light over the area I was working on.
After the scraping, I sanded each piece and they were then ready to attach to the veneered panels.
Step 6: Veneering the Panels


The other part of the door was made up of a veneered panel. For the front veneer I chose a Smoked/fumed Oak which is very dark/black to give a contrast against the oak pull and a cheap backing veneer. A backing veneer is required to stop the panel warping by equalizing any growth/contraction in the front veneer with humidity etc.
The plywood core was first cut to the required dimension and the veneers then cut oversized to this using a sharp stanely knife. Some of the doors required multiple pieces of veneer to be used to get the required width. I taped the pieces together to hold them tightly together while the glue dried.
I was now ready to glue the veneer to the plywood. I would first apply glue evenly to the front side of the door then place that onto the veneer, which was face down on a spare piece of plywood. The backside could then be glued and the backing veneer placed down.
Another board could then be placed on top, with cling film between to prevent it sticking to any squeeze out and clamps applied. Cauls were placed across the panel to try get even pressure across the piece. This setup wasnt ideal, a vacuum bag would have been a lot easy.. but this was cheap and worked.
Once dried the clamps could be removed and the excess veneer trimmed off.
Step 7: Door Assembly


To attach the pull to the veneered panel I cut a couple of domino joints and then glued/clamped the pieces together. Biscuits, dowels etc would also have worked.
Step 8: Finished


With the doors now complete I did a final bit of sanding then applied a polyurethane finish. The doors could then be hung and the drawer fronts attached!
These took weeks of work but I'm really happy with the end result. It makes the kitchen mine and gives it a unique look. And every time I open the cupboard for some crisps, I can justify them knowing the work/sweat that went into the door haha.
Hope you enjoyed and have gotten some ideas for your own projects!!

Participated in the
Woodworking Contest


