

Introduction: Tree Cabinet


This cabinet was part of a larger commission to build a set of office furniture the client wanted to be very natural.. their vision was to create a woodland office!! The furniture (this filing cabinet, two desks and something to hide a large printer in) was to look as much like trees/logs as I could, there would be lots of plants in the space and even a water feature.
This is very different to my own personal design style/preference but when they approached me with their vision for this, I couldn't say no. Aside from being a design/build challenge for me, I loved the uniqueness of what they were trying to achieve. If you're going to spend the majority of your week sat in the office, why not make it an exciting space you want to be in!
I wont go into the specific dimensions etc of this actual piece.. more the techniques used, that you could apply to your own piece of tree furniture.
Materials:
- Plywood
- Cork bark
- Seasoned logs
Tools/Supplies:
- Basic woodworking tools (drills, screwdrivers, handsaws)
- Table/tracksaw for breaking down the plywood sheets
- Jigsaw - used to trim the bark but could be done with a stanely knife or similar
- Brad nailer - used for attaching the bark. You could use manual hammer.
- Plasterboard adhesive. (Or expanding foam.. I think its the same stuff)
- Screws, wood glue..
Step 1: Design


Having some reference material is always a good starting point.. and luckily the majority of this project has been done during lockdown where going for walks in the local forest is the weekend activity rather than going to the pub... so I collected a lot of photos of trees.
Design sketches were initially presented to the client, that were then developed into a design vision for the piece. The basic idea was to create a plywood substructure that incorporated real logs and then clad this with some-sort of bark (I hadn't figured out the bark bit at this stage). The client had some rough dimensions he wanted to work too based on the folders/files etc that were to be stored in it so the plywood cabinet was designed to meet these and we then agreed some max dimensions for the additional branches. Overall the design is a bit of a balance between form and functionality. With it being so natural it was impossible to produce a detailed design/plan, so a mock-up image was used to get agreement on what I was expected to produce.
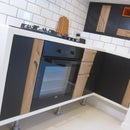
Step 2: Cabinet Body


I started the build by making a plywood cabinet. This sets the overall dimensions of the piece, specifically the internal storage size, and provides a starting point to making a tree-like form.
Trees are generally round, so I made the sides of the cabinet curved. This was done by kerf-bending (cutting groves part-way through) the plywood and gluing/screwing them to top and bottom pieces with the desired shape.
As this is all going to get covered you don't need to be particularly fancy with your joinery, it just needs to be strong! And because you're trying to make a 'tree', nothing has to be that exact.. trees aren't square/level!
I used 18mm ply for the top/bottoms. 12mm for the sides. And 6mm for a back panel.
Step 3: Making It More Tree Like


With the cabinet body as a starting point, it was now time to make things more tree-like! The plan was to use some real logs, as-well as additional plywood formwork to make a natural/random form.
I found a local firewood seller who let me go to his yard and pick out some seasoned logs/branches I thought would work with the 'vision design'. I firstly gave them a bit of a clean and treated them with wood bug killer (just in case), before screwing/bolting them to the plywood substructure.
I then started attaching additional pieces of plywood; one to further support the branches/logs and secondly to create the random, undulating form. I had no real plan here and it took a bit of imagination to envisage what it would look like once the bark was covering it, but generally I'd cut some pieces to set the depth out from the main surface and then cut triangular pieces to tessellate over them. It looked pretty crazy/messy at this stage with screws on shows etc, you just have to remember it'll all get covered up.
Step 4: Bark Cladding


The bark cladding was the hardest thing to get agreement on with the client and there was a lot of back and forth with samples. I had originally proposed using rough sawn or split pieces of timber to create small 'shingles' that would cover the piece to give a faux bark affect.. this was deemed too man-made.
After more research into options, I came across cork bark and it was an absolute winner - it is actually bark after all. The virgin cork is obtained directly from the harvest of the cork tree (making it a renewable raw material) and is submitted to a rigorous process to make it 100% safe and clean. Initially I found it for sale in large sheet form, that people use for decorative walls, but then managed to find a wholesaler for loose pieces - I ended up using 40kg for this!
The bark came as a random assortment of shapes/sizes/thickness, and it was a bit of a crazy jigsaw to clad the plywood substructure in it. You just need to go for it and start attaching pieces where they work.. if you start trying to search of the perfect piece to fit you'll be there for ever. I'd occasionally use the jigsaw to trim bits, but found using little pieces to hide the gaps between larger pieces worked best.
To attach the bark I used a combination of plasterboard adhesive (very similar to expanding foam but doesn't expand as much) and screws/brad nails to hold things whilst the adhesive dried. Because the adhesive is a foam and expands a little it takes to the random shape of the bark. Overall this work very well and secured the bark.
Step 5: Finishing Touches


To finish the inside of the cabinet I got some reclaimed pallet wood to clad the sides and some scaffold boards to make the shelves from. These were stained/painted to make it all a bit more rustic and hide the plywood.
I also carved some little mushrooms to add to the exterior. The top of the cabinet has a hidden shelf for plants and I created some little nooks for pots to be added to the sides/door so once some ivy and ferns are added its going to look great!
Super happy with how this turned out! Glad I'm not the one that has to dust it though..
Runner Up in the
Furniture Contest


