

Introduction: IoT Basics: Connecting Your IoT to the Cloud Using Mongoose OS


If you're a person who is into tinkering and electronics, more often than not, you'll come across the term Internet of Things, usually abbreviated as IoT, and that it refers to a set of devices which can connect to the internet! Being such a person myself, I was fascinated when I got to know that such great devices were easily accessible to me. The mere thought of being able to connect my projects to the internet using a small piece of hardware and just thinking about the innumerous gates that it would open for my project ideas had me pumped up.
But telling the IoT to connect to the internet isn't as simple as just buying it off the shelf and powering it up. And apart from getting the device to connect to the internet, we also need to push up some useful data to the internet. This Instructable deals with the procedure involved to attain the above-stated goal, and is meant for readers of any experience level, from beginners to veterans who are new to IoT.
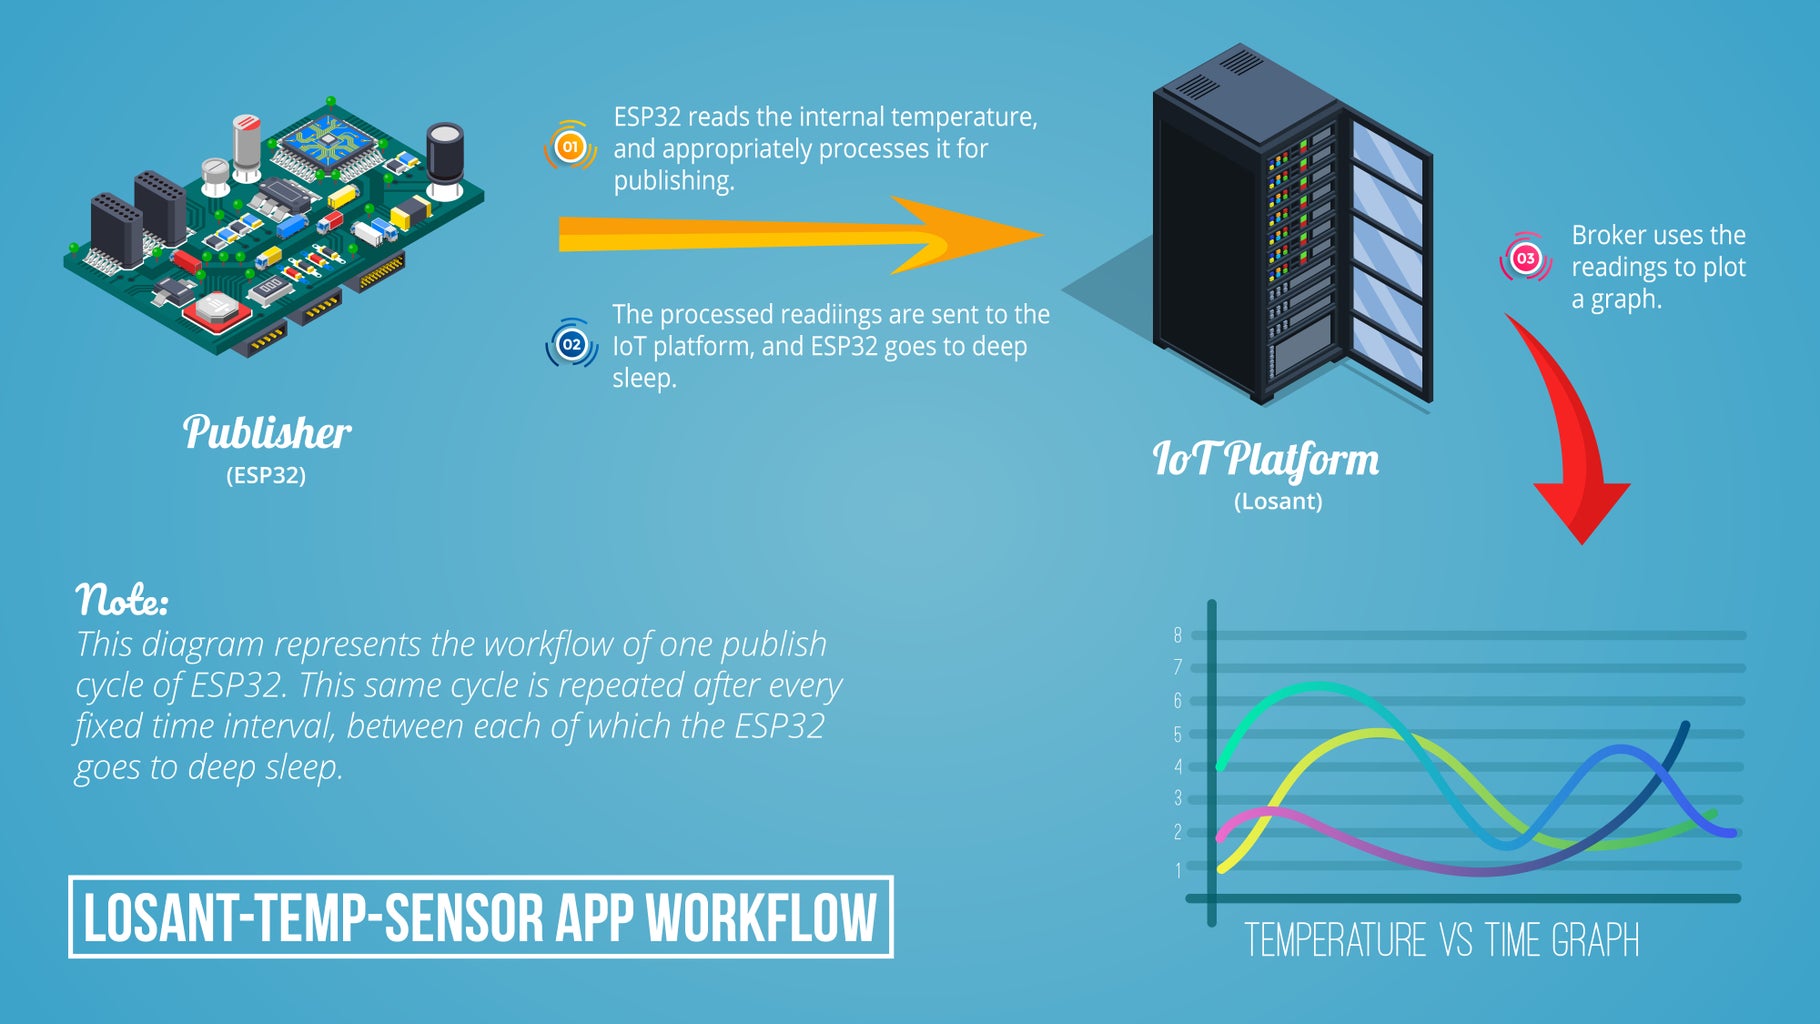
In this Instructable, as an example, I'll be demonstrating how to plot the graph of internal temperature sensor readings of ESP32 development board which should give the readers a good idea of the process.
Though this Instructable uses ESP32 and Mongoose OS, yet the procedure can be extended to all IoTs and firmware there are!
Supplies
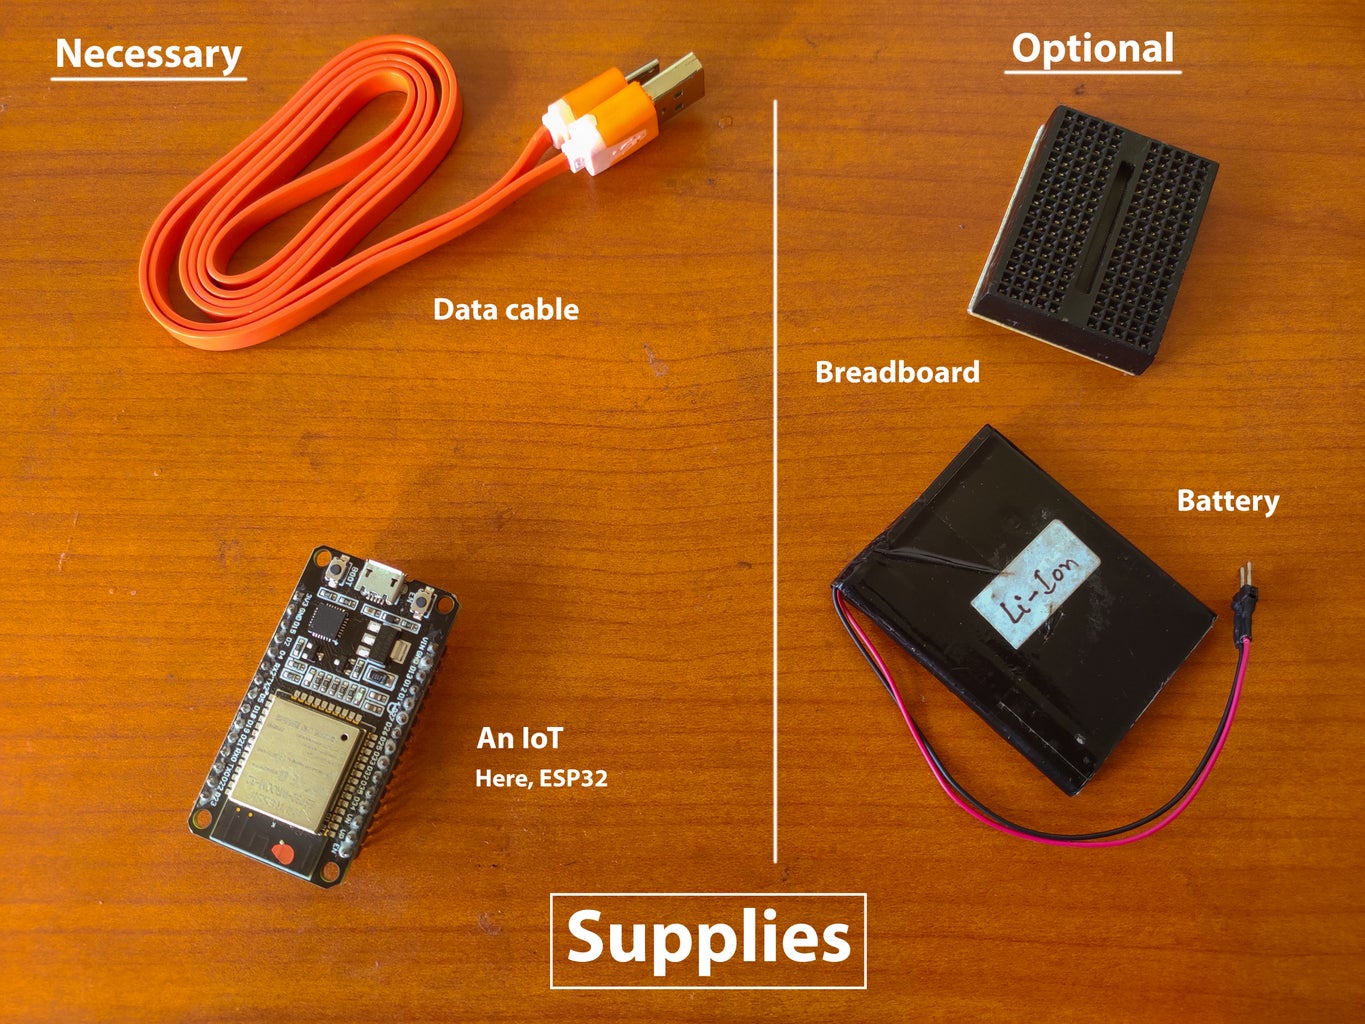
To be able to implement this Instructable yourself, you'll be needing only a minimal amount of hardware, and they are:
- An Internet of Thing(IoT): I have used a cheap ESP32 development board clone. If you're planning to buy a new ESP32 development board, then you must check out DFRobot's ESP32 board.
- A Data Cable: Use a cable which your IoT requires for flashing etc.
- A Battery(Optional): Buy this only if you intend to power up your IoT for long periods.
- A Mini Breadboard(Optional)
I suggest the reader to use an IoT different from ESP32 so that he/she may truly understand what's being done here, instead of just simply imitating me. Trust me, you'll enjoy implementing this process using your own mind in some other IoT, for example, ESP8266 would be a good choice.
Step 1: Introduction to MQTT

What is MQTT?
"MQTT is a simple messaging protocol, designed for constrained devices with low-bandwidth. So, it’s the perfect solution for Internet of Things applications. MQTT allows you to send commands to control outputs, read and publish data from sensor nodes and much more." (From RandomNerdTutorials)
How does MQTT work?
Before going technical, let's think about our real world first. Suppose that you are interested in a card collection owned by your friend's friend, say, Laurel, whom you personally don't know. Since you're very particular about that card collection, you'll ask your friend, suppose Tom, to ask if Laurel's willing to sell it or not. While doing so, you'll ask Tom to buy the card collection himself if Laurel's willing to sell, since you don't want some other person to get his/her hands on the collection you're craving for! As time passes, Tom and Laurel interact, and on mutual agreement, Laurel gives her card collection to Tom in exchange for money. After this exchange, Tom keeps the cards with himself until he meets you again, which is when he finally gives you the card collection. This is how a normal exchange proceeds in our daily life.
In MQTT, the basic elements involved in the exchange are the publisher(Laurel), a subscriber(You),and the broker(Tom). Its workflow is also similar to the above stated real-world example, except for one huge difference! In MQTT, the exchange is initiated by the broker, i.e. Laurel would be the first to reach Tom to tell that she wants to sell her card collection. If we compare the working of MQTT with our real-world example, then it would be as follows:
- Laurel tells Tom that she wants to sell her card collection(data or payload) and gives the cards to him.
- Tom takes those cards in his possession and is open to offers for the card collection. When you and Tom meet and he finds out that you're interested in the cards(subscribes to a topic). Tom then gives you the cards.
As the entire process relies on the broker and no direct interaction between the subscriber and publisher, MQTT removes the hassle of synchronizing both the publisher and subscriber. The presence of an intermediate broker is a boon for resource-constrained devices like IoTs and microprocessors as their processing power is insufficient to carry out data transfer the normal way, which would involve additional overhead expenses such as authentication, encryption etc. Apart from this, MQTT has lots of other features such as being lightweight, one-to-many distribution, and so on, which make it ideal for constrained networks and clients
Step 2: Introduction to IoT Platform
What is an IoT Platform?
"At a high level, an Internet of Things (IoT) platform is the support software that connects edge hardware, access points, and data networks to other parts of the value chain (which are generally the end-user applications). IoT platforms typically handle ongoing management tasks and data visualization, which allow users to automate their environment." (From Link-Labs)
Abstractly, an IoT platform acts as the medium between the user and the data collecting agents which is responsible for representing the collected data.
In this Instructable, we're planning to push our ESP32's temperature readings online. Our ESP32 will act as the MQTT publisher and the MQTT broker will be an IoT platform of our choice. Note that in our project, there is no role of an MQTT subscriber as the data is being represented by the platform itself firsthand. The IoT platform will be responsible for storing our published data and nicely representing it, here, as a line graph. I'll be using Losant as my IoT platform here since it is free to use and offers some good ways to represent data. Some other examples of IoT platforms are Google Cloud, Amazon AWS and Adafruit, Microsoft Azure etc. I'd like to advise the reader to refer to the documentation of their chosen IoT platform.
Setting up Losant:
- Login to Losant
- Create a device(Standalone type)
- Add a few data types to the device
1. Name: temperature, Data Type: Number
2. Name: offset, Data Type: Number
3. Name: unit, Data Type: String - Generate an access key and note down the device ID and access key
- Create a graph
1. Create a dashboard.
2. Add "Time Series Graph" block to it using the temperature variable and your created device.
The "Device ID" serves the purpose of acting as a unique fingerprint for a device. The "access keys", as the name suggests, allows the IoT to publish to Losant under the device identity.
Step 3: Prepare the MQTT Publisher
Now that we've prepared the IoT platform for receiving and representing the data, we need to prepare an MQTT publisher which would be responsible for collecting and sending the data to the platform.
The outline of MQTT publisher preparation is as follows:
- Write the code:
To instruct the publisher(IoT) how to collect data, process and send it to the IoT platform. The instructions are written in human-readable high-level programming languages which is normally referred to as the code. - Flash the firmware:
The IoT won't readily understand these instructions as it doesn't know any language initially. To bridge this language barrier between the human and machine, the code is compiled into a crude set of instructions, basically sets of hexadecimal or binary values specific to memory locations inside the IoT, known as the firmware which is then flashed to the IoT.
In this Instructable, since I'm using my handy ESP32, I'll be flashing Mongoose OS firmware to it, which accepts programs written C and JavaScript both. Apart from JS compatibility, Mongoose OS still has lots to offer, such as over the air updates, for tweaking your program online, and a dedicated dashboard for devices(mDash)etc.
I have developed an open-source app for Mongoose OS for this Instructable. It is a simple app named losant-temp-sensor, which employs MQTT to send the approximated ambient temperature readings, based on the internal temperature readings of the ESP32, to Losant(a free-to-use IoT platform). It is advised to go through the app's code for a better understanding. We'll be flashing this app for this Instructable.
If you're the of the adventurous kind, then you may try achieving the same goal with Arduino-ESP32 firmware which enables using the ESP32 as an Arduino(with WiFi capability).
A quick rundown for flashing app with Mongoose OS:
- Install mos tool for your OS.
- Open the tool and execute the following commands:
- mos clone https://github.com/mongoose-os-apps/losant-temp-sensor/
- cd losant-temp-sensor
- mos build --platform esp32
- mos flash
After successful flashing, allow the device to reboot and then execute the following commands:
- mos wifi "your wifi ssid" "your wifi password"
eg. mos wifi "Home" "home@123" - mos config-set temperature.basis=<basis temperature>\
temperature.unit="<preferred unit>"
eg. mos config-set temperature.basis=33 \
temperature.unit="celsius" mos config-set device.id=<device id from losant>\
mqtt.client_id=<device id from losant>\
mqtt.user=<access key>\
mqtt.pass=<access secret>
- mos wifi "your wifi ssid" "your wifi password"
After finishing all these steps correctly, you'll end up with an ESP32 which sends the temperature readings to Losant periodically, after every 10 minutes. Successful publishing is indicated by the blue LED, as shown in the above video.
Step 4: Footnote


If you're able to replicate the previous steps correctly, then now you'll be having a working project with the help of which you can observe the temperature trends inside your room, or wherever you plan to place the project. Since I've kept this Instructable as general as I could make it, therefore you can use your IoT to collect data of all sorts and try to conclude something useful from it, or you can do it just for the sake of tinkering if you've properly understood this Instructable.
For me, the best part about IoT is the fact that it enables us to collect huge chunks of data, inconclusive if taken alone and convert it into something conclusive. This really hits home the spirit of science. For me, it was very satisfying and enlightening to notice the temperature fall inside my room during rain hours through my graph.
The losant-temp-sensor-app has been optimized for power consumption, as it uses the deep sleep feature of ESP32 therefore you can use it for long periods of time without worrying about the battery at all. You can further extend the power efficiency by removing the LED on development board. The current draw of the entire setup has been shown above.
The aim of this Instructable, right from the beginning was just to give you an introduction to the world of IoT. On finishing this Instructable, you'll have a good hold on the basics which you can strengthen even more through other online resources.
Though you won't be able to make complex projects at this stage, yet it should always be kept in mind that if you have a strong enough brick, and a way to combine them together, then you can make any imaginable structure, from simple to complex. Similarly, having a good grasp on the basics and knowing how to apply them correctly will enable you to put up multitudes of contraptions. Therefore give yourself a pat on the back for taking the first step.
Step 5: Credits and Support
This Instructable consists of illustrations, e.g. the one which explains MQTT exchange, which I've personally made. Those illustrations have only been possible thanks to the following free-to-use SVG packs:
This Instructable has been sponsored by DFRobot. DFRobot has an awesome electronics collection so be sure to check it out.
If you feel that you liked this Instructable and want more Instructables like this, then you can support me on Patreon. If you can't go that far, then you may follow me here on Instructables.


