

Introduction: MLAB | AVENGERS ENDGAME ANULAX BATTERY


In celebration of Avengers: Endgame, we wanted to create a project that celebrated 10 years of the Marvel Cinematic Universe (MCU) as well as showcased the potential for anyone to be a Marvel in their own right using CAD (Computer Aided Design), a 3D Printer, and Electronics.
If you happened to watch Guardians of the Galaxy Vol. 2, the opening scene featuring an adorable dancing Baby Groot, you were able to catch a glimpse of a valuable and volatile power source in the MCU; Anulax Batteries. In the following scene, the Guardians have been hired to protect a batch of Anulax Batteries from an energy munching monster because Anulax Batteries are highly sought-after for their immense power.
In our world, ideas and those who create them are as powerful and highly sought-after as Anulax Batteries.
Hence, we made it our mission to make an Avengers: Endgame inspired Anulax Battery (not Harbulary Batteries...Drax) ourselves.
Follow these simple steps to create your own Anulax Battery inspired by Avengers: Endgame.
Special Thanks to Mbadika Senior Engineering Intern Andres Mendez Perez for bringing this Project to reality as well as Josh 'Badger' Atack and SmithDrewSmith for inspiring this Instructable.
Step 1: Introduction to CAD


In this Step-by-Step, we will show you how to make a 3D model of an Anulax Battery.
Drawing inspiration from Josh 'Badger' Atack's illustrations of the Anulax Battery, we wanted to create something that represented how marvelous our team is at Mbadika.
Check out the mLab Episode IX: 'Avengers: Endgame Anulax Battery' below to see how we brought the following steps to life.
In order to create our 3D model, we used Sketchbook and Tinkercad 3D Designs.
Sketchbook, is a software that allows for you to transform your drawings into a digital format on a wide variety of devices (i.e. your computer, iOS and Android Device, and even your Fire Tablet).
The second software application we are using, Tinkercad, is a 3D design or CAD software that allows you to transform your ideas and sketches into 3D models simply using your computer.
As an added bonus, both software applications are free to use!
Now, if the term "CAD" sounds unfamiliar to you, don’t fear. CAD stands for Computer-Aided Design. CAD is a type of software that allows for us to build 3D objects using our computer. Once we are finished with our Tinkercad CAD model, we can export the model to a 3D Printer, a machine that uses materials such as plastic in order to print physical objects. If you don't have access to a 3D Printer, you can also order a 3D print from online 3D Printing resources or explore your local resources to 3D Print your CAD Model (For Example; your local school or library or makerspace).
Regardless of what you decide to do with your CAD Model, the most important step is to get started.
So...Let's Get Started!
Step 2: Avengers Endgame Anulax Battery Design


After developing our Sketch of our Avengers: Endgame Anulax Battery, we can now transform our Sketch into a CAD Model using Tinkercad. Feel free to follow along with the mLab Anulax Battery Tutorial video below;
THE END CAP
In Tinkercad, we are going to start designing our End Cap by bringing a 'Basic Shape' from the Right Toolbar;
- Bring the Orange 'Cylinder' Basic Shape from the Right Toolbar onto your Workplane.
- Edit your 'Cylinder' Basic Shape using the Shape Toolbar
- If you desire, Edit the 'Color' of your Basic Shape Solid to your desired Color.
Since, we want to make the interior of our Anulax Battery End Cap hollow, similar to a bottle cap, in order to disguise the electronics for our Anulax Battery. In order to do so, we need to Duplicate our Orange 'Cylinder' and make it slightly smaller.
- Transform duplicate Orange 'Cylinder' into a Hole and raise it above your previous Cylinder in order to ensure we leave just enough room for it to cover the top of our Bulb.
- Select All Objects...and Group.
Given that we always strive to be a little extra, let's bring another Basic Shape, like the 'Roof' Shape from our 'Basic Shape' Toolbar to create an adornment for our Anulax Battery.
THE BULB
Now, we need to create the bulb for our Anulax Battery. For the Anulax Battery Bulb, we wanted to imitate hand blown glass by including very unique, round, and curvy shapes. In order to do so;
- Move your End Cap to the far corner of your Workplane, in order to provide yourself enough space to work on your bulb.
- Grab a Blue 'Sphere' from the Basic Shapes Toolbar and smoosh it by altering its height until it looks like a marshmallow (*squish*).
- Grab a Half Sphere. Flip It. Raise It...until it sits on top of our smooshed Sphere.
- [TIP: Feel free to play around with your Bulb until you get a shape that you adore.]
- We want to have at least a 10mm LED to fit inside our Bulb, therefore, we need to create a Hole in order to create space for our LED to fit inside our Bulb. Therefore;
- Grab a transparent 'Cylinder Hole' and bring it to our Bulb CAD Model.
- Select All. Align. Group.
Once we have an End Cap and Bulb, it's time for our Middle Joint to bring it all together.
THE MIDDLE JOINT
The Middle Joint is where the electronics for our Anulax Battery will reside, which will be a Simple LED Circuit featuring the following components; A Coin Cell Battery, Coin Cell Battery Holder, Push Button, and (2) LEDs.
Therefore, we need to once again create a bit of space on our Workplane because the Middle Joint is going to need it.
- Grab an Orange 'Cylinder' and create a CAD Model similar to an End Cap (similar to what we did earlier) in order to ensure our Middle Joint can serve as the End Cap for the Bottom of our Bulb.
- Create a Hole using the transparent 'Cylinder' for our Middle Joint in order to allow for a LED to emerge from one side of our Middle Joint.
- Select all Shapes. Align. Group.
Once we have our Middle Joint, we need to make room for our Push Button in order to control our Anulax Battery. Our Push Button has a Diameter of 13.5mm, hence we made a Cylindrical Hole of the same Diameter for our Middle Joint.
Now, we need to put it all together. How? Quite Simple, given we already did the hard work.
- Duplicate the End Cap. Rotate.
- Duplicate the Bulb. Rotate. Align. Check. Check.
- Select All. Group
When assembled, and a few personal tweaks, our version of the Anulax Battery will look something like this...
Step 3: Send Your CAD Model to the 3D Printer


If you have access to a 3D Printer;
Congratulations! You can make your Avengers: Endgame Anulax Battery into reality. If not, you can have your CAD Model printed at your local school, library, or maker-space with public access to a 3D Printer or you can order online and have it shipped to your home through VooDoo Manufacturing.
How do you export your CAD Model for 3D Printing? It's simple.
In Tinkercad, you can go to the upper Right Hand Corner of the Upper Toolbar and Export your CAD Model as a .STL File.
For example, for our intial prototype we are using a Dremel 3D20 3D Printer, so we will be using Dremel DigiLab.
If .STL sounds a like an alien format, don't panic just yet. STL files are a very popular file format for 3D or CAD Models and its similar to exporting a document as a Microsoft Word (.doc) or PDF format (.pdf).
Once you upload the .STL File to your 3D Printing Software, the software will transform your CAD model into a language that machines, in particular 3D Printers, can understand.
So, in order to recap: .STL = Language for 3D Modeling and Printing Software .gCode = Language for 3D Printers to understand CAD Models In our case, we used Dremel DigiLab, which allows for you to upload .STL files and convert the file into the .gCode that corresponds to our Dremel 3D20 3D Printer.
Don't feel limited to simply using one type of 3D Printer. We also used a FormLabs Form 2 in order to create a Clear Resin version of our Anulax Battery.
Step 4: Power Your Anulax Battery

In order to power our Anulax Battery, we will need the following components;
- 3D Printed Anulax Battery Components
- (2) 5mm or 10mm LEDs
- 3V Coin Cell Battery
- Coin Cell Battery Holder
- Push Button
- Hook Up Wire or Jumper Wires
- Wire Cutter
- Needle Nosed Pliers
Optional Equipment and Materials;
- Soldering Iron w/ Solder
- Fume Extractor
- Hot Glue Gun
First, we need to create a Simple Circuit by wiring our (2) LEDs to our Coin Cell Battery Holder;
The (+) Leg of our LED #01 to the (+) LEAD from our Coin Cell Battery Holder
The (-) Leg of our LED #02 to the (-) LEAD from our Coin Cell Battery Holder.
Connect a Hook-Up Wire between the (-) Leg of LED #01 and the (+) Leg of LED #02.
Now, in order to make life easier for ourselves; let's place our Push Button inside of the bottom half of our Anulax Battery. Next;
- Take your Needle Nosed Jewelry Pliers and bend the ends of your remaining wires through the holes of your Push Button.
- Give your circuit a quick test and ensure both LEDs turn on and off when you push your Push Button.
- If not, don't fret, go back over the above steps and troubleshoot until you get both LEDs turning on.
Just like we did with our Captain Marvel Power Glove project, we can further secure our electronics by Soldering and using a Hot Glue Gun. This step is optional and if you are a Minor please secure your electronics with the assistance of an Adult.
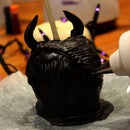
Now armed with your wired Anulax Battery, we can attach the Top of your Anulax Battery.
Test your Anulax Battery Once you are confident your project is ready, you can add further security to your project by adding a layer of Hot Glue or Rubber Cement around any gaps in your Anulax Battery to protect it from the elements such as water or dirt from damaging your circuit.
There you have it, an Anulax Battery worthy of any Marvel Superhero.
Step 5: What's Your #EndGame?


It's been a journey full of twists and turns, but we are finally in the #EndGame.
You've created your very own Avengers: Endgame Anulax Battery!
When it comes to your Anulax Battery, it's very important to customize it in order to make it your very own.
As you have seen so far, Tinkercad allows you to make CAD Models and Circuit Designs to bring your ideas to life.
For example, given our favorite colors are Yellow, we customized our Anulax Battery further by adding additional shapes and Golden Yellow End Caps in one version or an Avengers Logo Button Cap in another version.
In another version, we used a Form Labs Form 2 SLA 3D Printer in order to make a transparent version of our Anulax Battery to make our Battery shine like a diamond.
However, YOU can take this project a step further in terms of customizing your Anulax Battery. You can alter your design to make your Anulax Battery into a Pendant, Keychain, or even a Night Lamp.
This project is simply a canvas to express what makes you Mar-vel-ous.
Whatever you decide to do, simply #BuildMakeLearn. Plus, don't forget to share snapshots of your creations with us on Social Media (Instagram, Twitter, and Facebook: @Mbadika) using the Hashtags - #mLabBuilds #EndGame
Now to celebrate Avengers: EndGame...


