

Introduction: Magnetic Shaft Encoder


This instructable explains how to make a magnetic shaft encoder using a 3mm x 6mm neodymium magnet, an MLX90393 3-axis magnetometer, and an Arduino UNO R3.
The encoder outputs the absolute angular shaft position in degrees.
Accuracy is excellent ... angles between 0~360 degrees plot a straight line.
Potential applications include measuring servo joint angles and DC motor position.
Arduino test code and STL files are included.
The estimated cost of the encoder, excluding the Arduino, is less than $10.00
Supplies
The following items were obtained from https://www.aliexpress.com/
- 1 only MLX90393 Hall 3D Sensor module
- 1 only 3mm x 6mm Neodymium magnet
- 1 only I2C bidirectional 3.3V to 5V logic level converter
- 1 only Arduino UNO R3 with USB cable
The following additional items were used for testing:
- 1 only Arduino Uno R3 with USB cable
- 1 only 17HS3430 bipolar stepping motor
- 1 only Big Easy Driver module
- 2 only M3 x 10mm bolts
- 2 only M3 nuts
- Arduino hookup wire
The following items were 3D printed:
- 1 only sensor bracket
- 1 only magnet holder
Step 1: Circuit Diagrams

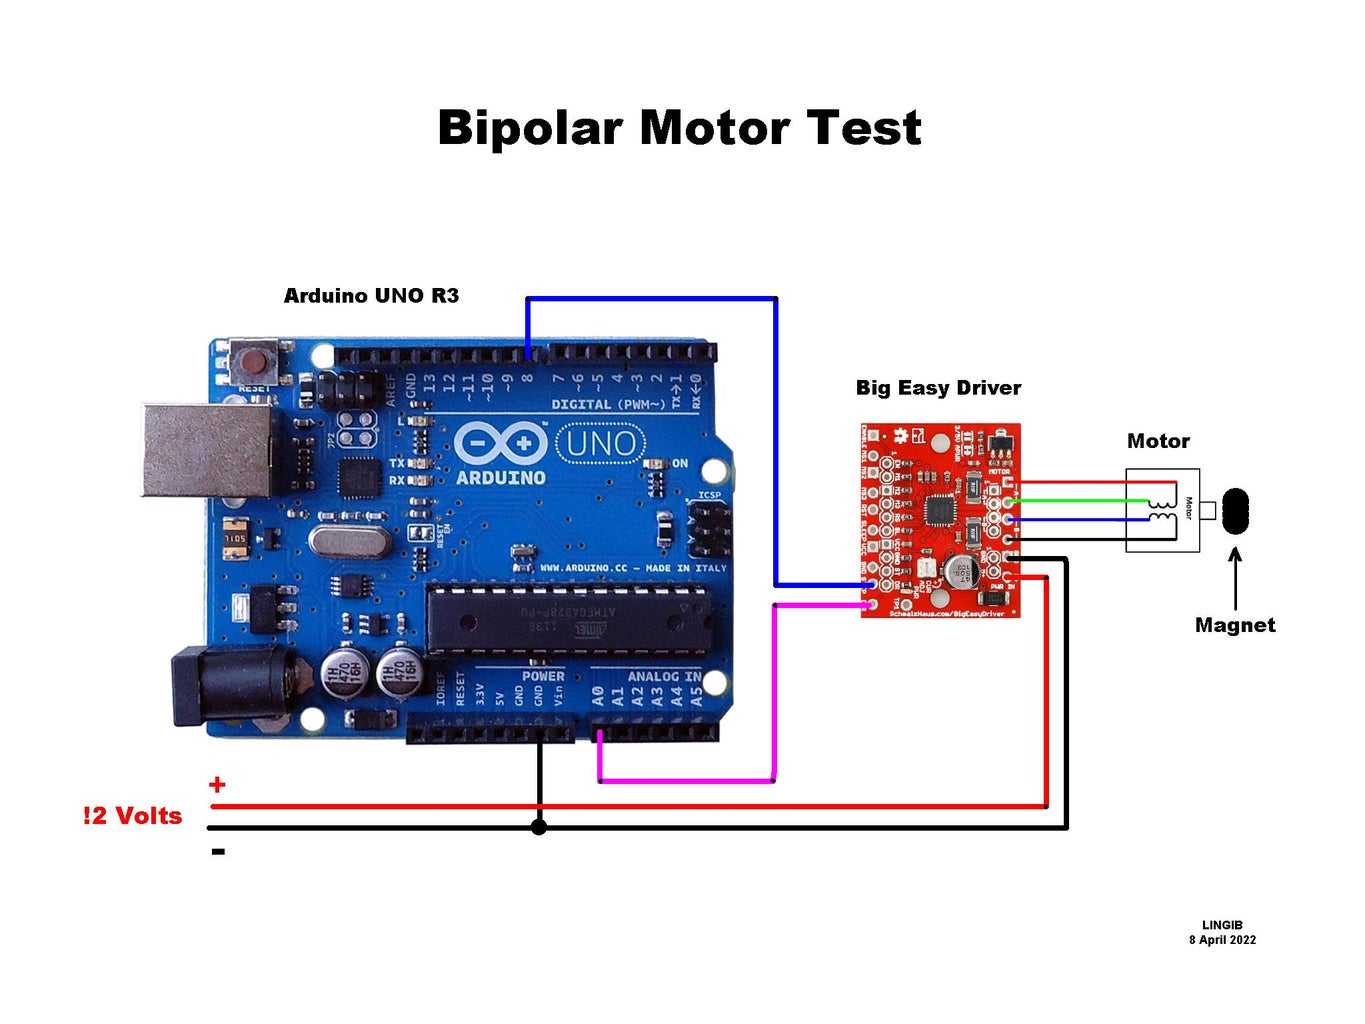
The encoder circuit diagram is shown in photo 1.
A logic level-shifter reduces the 5 volt Arduino levels down to 3.3 volts for the MLX90393 sensor.
Photo 2 shows the optional “bipolar motor test jig” used for plotting the curves.
Step 2: Theory


The MLX90303 is a 3-axis magnetometer with 12-bit angular resolution. [1]
The Earth’s magnetic field may be ignored when the MLX90393 3-axis sensor is in the presence of a strong magnetic field.
Quadrature X-axis and Y-axis sinewave outputs are obtained if a neodymium magnet is rotated directly above MLX90303 chip ... the Z-axis output remains constant. (photo 1)
To be of use the X-axis and Y-axis sinewaves must be scaled to the same amplitude and their midpoints centred about zero. (photo 2)
Once we have done this we can calculate the shaft angle using the following code segment. [2]
Angle = atan2(y, x)*RAD_TO_DEG;
if (Angle < 0) Angle += 360;
The green waveform in photo 2 shows the angle-of-rotation. The 0..360 degree amplitude has been scaled to 0..3600 for clarity.
References
[1]
https://cdn.sparkfun.com/assets/learn_tutorials/5/7/7/MLX90393-Datasheet-Melexis.PDF
[2]
Code line 2 is required as the atan2(y,x) function outputs -180 ~ 0 when the shaft angle rotates from 180 ~ 360 degrees.
Step 3: Construction


Key construction points
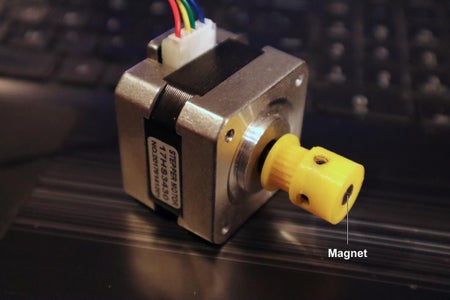
- Center the magnet over MLX90393 sensor chip.
- Position the magnet close to the sensor to swamp any external magnetic field.
- Maintain a constant distance between the magnet and the sensor.
The curves in photo 1 were obtained when a magnet attached to a motor shaft was rotated clockwise twice then counter-clockwise. These curves are smooth because the distance between the magnet and the MLX90393 sensor was constant.
The curves in photo 2 were obtained using the experimental test jig shown in photos 3 ~ 5. In this experiment the magnet was rotated by hand. The wiggles in the curves are due to a slight rocking motion as the magnet was turned.
Step 4: Mounting Brackets


Photos 1 & 2 show the 3D brackets used for testing
File "GT2_encoder_pulley.stl" produces the GT2 test pulley shown in photo 1. A 6mm x 3mm neodymium magnet is inserted into the end “pocket”
File GT2_sensor_mount.stl" produces the MLX90303 mounting bracket shown in photo 2. The MLX90303 module is attached to the bracket using M3 bolts via the two M3 holes at the top right. The two lower-right holes are screwdriver access holes for attaching the bracket to the motor.
The STL files were created using FreeCAD 0.2.
Cura 4.13.1 was used to slice the models.
The models were printed on a Voxelab Aquila printer with a nozzle size of 0.2mm.


Step 5: Software Installation


Install the library
- Open your Arduino IDE (Integrated Developement Environment)
- Click “Sketch | Install Library | Manage Libraries”
- Wait for the Library Manager to appear.
- Type “MLX90393” in the search bar (photo1)
- Select the “Adafruit_MLX90393” library
- Click “Install”
Install the encoder software
- Download “MLX90393_encoder.ino”
- Copy the contents into a new Arduino Sketch ... use a text editor such as Notepad++ ... not a word processor.
- Save the sketch as "MLX90393_encoder" (without the quotes)
- Compile and upload the sketch to your Arduino.
Calibrate the encoder
- Attach the magnet and sensor bracket to a NEMA17 stepper motor.
- Run “MLX90393_encoder.ino”
- Open your Serial Monitor.
- Manually rotate the motor shaft once ... this calibrates the sensor.
- (Alternately run the motor code described below)
- The absolute shaft angle will now be displayed on your monitor.
Optional motor software
Install the following software on a separate Arduino if you wish to rotate the motor using software:
- Run another instance of your Arduino software
- Select the COM port number for this second Arduino
- Download “bipolar_motor_test.ino” and copy the contents into a new Arduino Sketch ... use a text editor such as Notepad++ ... not a word processor.
- Save the sketch as "bipolar_motor_test" (without the quotes)
- Compile and upload the sketch to your second Arduino.
- Open your “Serial Monitor”
- Set the Baud speed to 115200
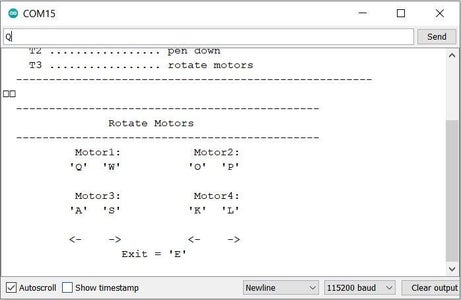
- Enter T3 in the Serial Monitor (photo 2)
- Use the Q and W keys to rotate the motor clockwise and counter-clockwise (photo 3)

Step 6: Summary
This instructable explains how to make a magnetic encoder using a 3mm x 6mm neodymium magnet, an MLX90393 3-axis magnetometer, and an Arduino UNO R3.
The encoder outputs the absolute angular shaft position in degrees.
The accuracy is excellent providing the distance separating the magnet from the magnetometer is constant.
The sensor is small, light weight, and cheap which makes it suitable for projects such as measuring servo joint angles or the rotation angle of DC motors.
Sample Arduino code and STL files are provided.
Click here to view my other instructables.


