

Introduction: Simple One Part Moldzzz


One of the most basic molds to make is an openface one part mold.
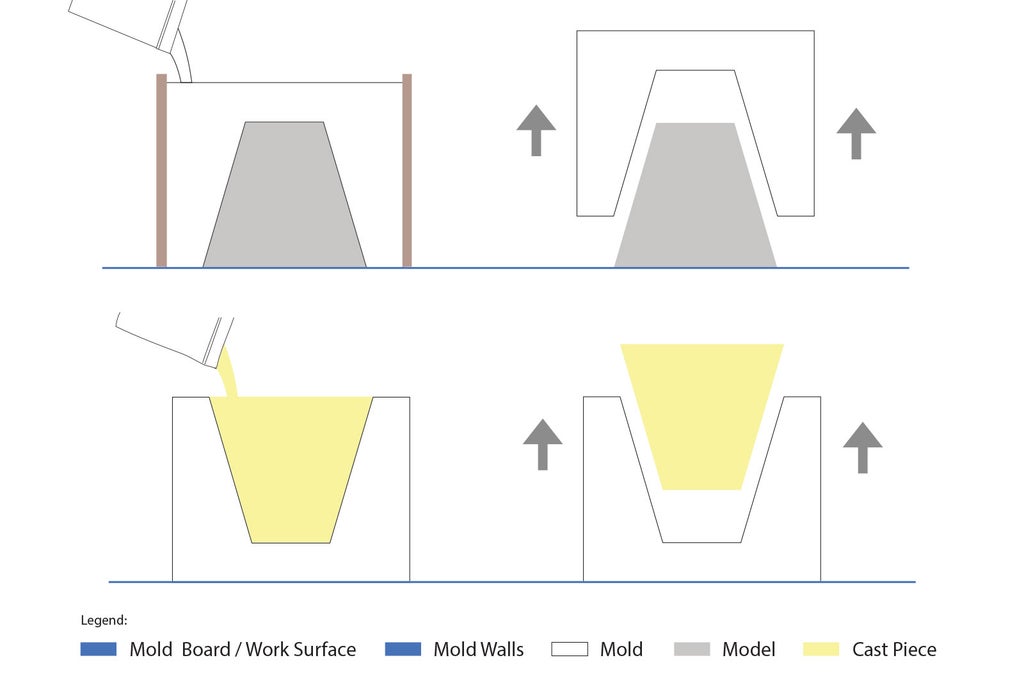
This type of mold is ideal for flat backed models with no undercuts (i.e.: one sided medallions, tapered cups without handles, chocolate molds, popsicles, and so much more!).
It's also the only one part mold method you would use when using a rigid mold material - like plaster for ceramic casting or a silicone rubber with limited flexibility.
The models can be low relief or high mountain peaks (scaled down of course), but they must not have undercuts if using a rigid mold material. You will see in the next lesson, that this isn't the case if you're using a flexible mold material.
Another reason to choose this type of mold and a model with no undercuts, would be if you plan on casting a thin object in a delicate material, like chocolate or ice. With these materials, even if the mold is made of a flexible silicone, undercuts may cause the cast to break when removing it from the mold.
Step 1: Ideal Models for This Mold Type

When evaluating a model you'd like to make a mold of, it's important – as we learned in the Introduction lesson – to understand which shapes work best with which types of molds and mold materials.
For a successful open-faced one part mold, you want a model that is flat backed and has no undercuts. If you're planning on making a plaster or other type of rigid mold, you also need the model to have at least a small draft angle.
What is a draft angle?

A draft angle is a slight taper (angle) in from what would be a perpendicular line drawn from the bottom edge of the model up away from the mold board/work surface.

A slight draft angle on a model allows it to separate from the mold. If the sides of the model were straight up and down cast in rigid model material, friction would not allow the model to be released from the mold.
Step 2: Tool & Materials

You will need the following to make a food-safe, one part silicone mold from a model with no undercuts:
- Flat backed model with no undercuts (in my case, a plastic rhino made for sand casting)
- 2.8 lb box of Smooth-On's Sorta-Clear 37 food safe silicone rubber mold material*
- Round stir sticks
- Mold board (mine is 10" x 14")
- Mold wall material**
- Glue gun & glue sticks
- SOFT sulfur-free sculpting clay
- Masking tape
- Metal scraper
- Exacto knife
- Sculpting tool
- Butter knife with a flat side
- Thin permanent marker
- Ruler
- Pencil
- Notepad
- Spray on cooking oil
- Disposable brush
*Or more if you are making a bigger mold of a bigger model.
**I used a strip of plastic corrugated sheeting, but you could use foam core or acrylic walls instead. See the previous lesson all your options.
IMPORTANT SAFETY SUPPLIES:
- Latex-free disposable gloves
- Safety glasses with side shields
- Apron
Step 3: Filling a Hollow Model

In preparation for making the mold, if your model is a hollow shell (or is filled with air as you'll see in the next lesson), it's important to fill it so that once the model is fixed to the mold board, it is no longer filled with air. If you don't fill it and don't get a perfect AND STRONG seal when attaching it to the mold board, there is a chance that the mold material will force its way into the model, releasing the seal, and you'll end up helplessly watching it float to the top – ruining your mold!!
Here is a short video that demonstrates this heartbreaking phenomenon:
To fill an open faced hollow mold, do the following steps:

Put on your disposable safety gloves. (Oil based sculpting clay can stick to your skin, so I prefer to wear gloves, but it is not mandatory for this step.)
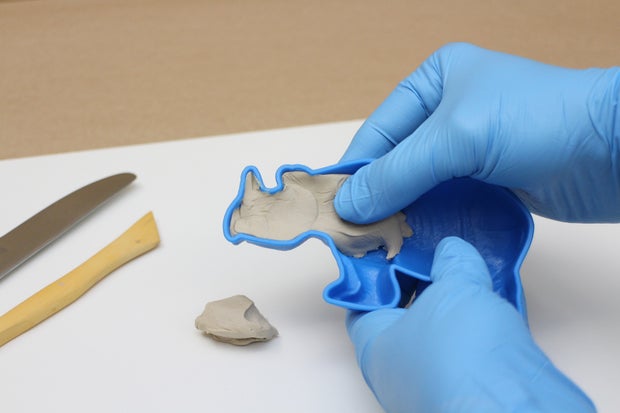

Fill the inside cavity of the model with the sculpting clay.


Use the flat backside of a butter knife to scrape off any excess clay, so you end up with a nice smooth surface that is flush to the model's edge (like pictured).
Step 4: Attaching Model to Mold Board

To secure the clay filled model to the mold board surface, roll thin 'snakes' of the sculpting clay and place them along the outer edge of the model's bottom.

Place the model clay down and centered onto the mold board. Press the model down onto the board using the heel of your hand until the model is flush and even with the board surface.

Use a sculpting tool to remove the excess clay that squished out during the pressing process.

Ta Da!
If you're using a model that wasn't hollow and therefore isn't clay filled, use hot glue or strong double stick tape to secure the model to the mold board. See Flexible Block Mold lesson for these instructions.
Step 5: Marking & Making Mold Wall Lines

Silicone rubber mold walls should be at least 1/2" thick at every point of the model. Use a ruler and pencil to put 1/2" marks from the furthest point of the model on all four of its sides.

Then use the ruler to draw a rectangle around the model, following the 1/2" marks you just made. These lines are where you want the mold walls to be placed.
Step 6: Building Your Mold Wall


Use a ruler to measure the height of your model's highest point (mine is 7/8" H). Then cut a strip of mold wall material that is:
- Long enough to go around the mold wall lines you measured and drew plus enough for a fold over flap
- The height of your model + 1/2" for the mold material thickness + at least another 1/2" to keep the mold material from overflowing. For me this equalled 2 1/4" H x 22" L.


Use a pencil to mark the lengths of the wall sides onto the strip. For the front side, make the line slightly longer than the actual length (the length plus the thickness of the wall material). This accommodates for the fold over flap.

Then use a ruler and exacto knife to cut lines perpendicular to the marks ONLY HALF WAY through the material. By doing this you are creating 'hinges' while still maintaining the integrity of the containing material.
NOTE: Don't worry if you accidentally cut all the way through in a few spots. You can use masking tape to patch the cuts up.

This is what my finished cut wall looks like.

Tape the flap down to make create the rectangular wall.

Add wide masking tape to the inside corner to seal it off.


Cut and fold over the excess tape.

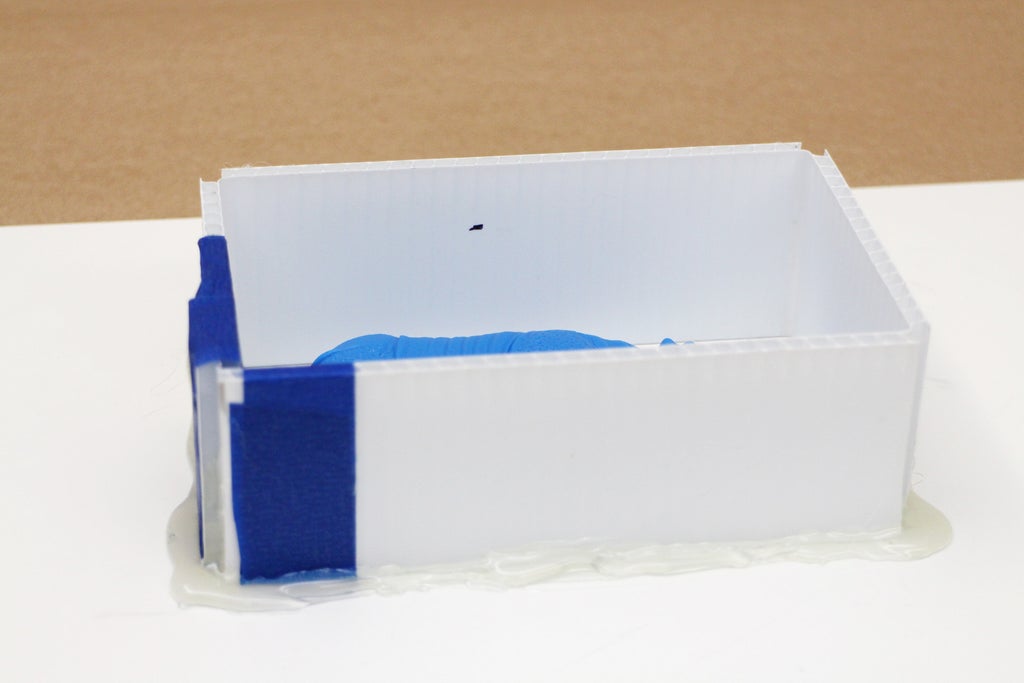
You did it! You now have a functional mold wall / form / box!
Step 7: Attaching Your Mold Wall

Once you've measured and made your wall to size, attaching it is a cinch! Step one is plugging in the glue gun.
NOTE: Be sure the glue gun nozzle is off the ground and that it's over a surface that can handle glue drips.

Place the wall on the mold board so that it lines up with the pencil marks you drew earlier.

Once your glue gun is hot enough, hold the wall in place and add a thin bead (line) of glue all the way around the base of the wall, being careful not to miss any spots. Let the glue cool completely.

Once cooled, inspect the seal to make sure that it is continuous all the way around with no holes, gaps, or breaks. If you need to add any more glue, do so. I also recommend adding a bead from each corner going up the wall about 1". (like pictured)

Measure and mark the exact spot the mold material must come up to in order to completely cover the model plus the recommended 1/2" above the highest point of the model. My model is 7/8" tall, which means that when I pour in the mold material, it must come up to the 1 3/8" line that I made.
Step 8: Finding the Mold Material Amount Needed

Now I'm going to show you the simplest way to discover the amount of mold material needed for this type of mold. You need to mix enough to fill the mold void to the mark you made in the last step, while not making so much that you waste expensive material unnecessarily.
There's just two simple things you'll need:
- A container of small grain*
- A measuring cup
*I like to use small tapioca, but millet or short grain rice will also work. (Small plastic pellets are also an option if you have access to those.)
NOTE: I don't recommend eating the grain after using it for this process. Keep it and use it again for your next mold!


Fill the mold void up with your chosen small material bits to the marked line.


Pour the grain/pellets out into the measuring cup (make sure none are left behind) and there you have it! The amount of mold material you'll need to mix up in ounces (oz). For my little rhino mold I need to mix 13 oz.
If you're unsure whether you need say, 12.5 oz or 13, always round up. It's better to have a tiny bit too much than not enough.
Step 9: Spraying Mold Release


Because this is to be a food-safe mold, spray-on cooking oil is the best and safest mold release to use. I'll be using a food-safe silicone material to make the mold and even though silicone doesn't usually stick to any other surface or material other than itself, I still think it's still best practice to use a light mold release.
Holding the spray bottle about 8-10" away, spray a light mist of oil over the:
- Model
- Inside of the walls
- Inside mold board area around the model

If there are any bubbles in the oil release, use a small brush to lightly brush the surface of the model until they are gone.
Step 10: Mixing the Mold Material

Always follow the mixing and safety instructions that come with whatever mold making material you choose.
With any silicone, you should always wear latex-free disposable gloves, safety glasses, long sleeve shirts, and an apron. Make sure you're working in a room with plenty of ventilation.

Mark your mixing container with ration amounts that particular materials calls for. Mine is a 1:1 ratio, so I marked my container at 6.5 fl oz and at 13.


Part A will go in first, filled up to the first mark.

Then the premixed Part B will be added until the 13 oz line is reached.

This particular food safe silicone I'm using, Smooth-On Sorta-Clear 37, ideally should be put in a vacuum chamber to de-gas (i.e.: un-bubble) once mixed, but if you don't have one, don't worry. I still get great results without degassing. Instead, I use round dowels as stir sticks and stir very slowly (and evenly - no lifting the stir stick up and down quickly) to reduce the amount of air I'm introducing to the material. If you have a vacuum degasser, lucky you! Put the mixed material into it for 2-3 minutes before pouring. If not, proceed anyway!
Step 11: Pouring the Mold

This part of the process takes some patience, visual accuracy, and guts.

The first thing to do before starting to pour is to pick the lowest and easiest to access corner/spot within your mold. As an example, mine is marked by the green dot in the image above.
The key to pouring a good silicone mold (or any for that matter) is to do is slowly (NOTE: video is sped up 900x normal speed), carefully, and from a ways up. By that I mean that you will want to lift your mixed material container at least 10 inches above the top of the mold wall to begin pouring. The force on the material falling from that height helps prevent air bubbles from forming.

Here's where the guts and visual accuracy comes in. You need to start pouring from way up there. And you need to start pouring SLOWLY! Just a very tiny stream of material.
Try to hit your corner/spot target, but if you miss, don't stop, just slowly move the stream until it's hitting that spot. The thinner the material stream and the more slowly you pour, the more successful your results will be.
It's also important that you keep the stream hitting as close as you can to the exact same spot for the whole pouring process. This allows the material to find its own level as it rises, which will give a nice and even coverage of the model without air bubbles occurring.

Keep pouring from up on high until the model is entirely covered. Then it is ok to lower your arm a bit, but not all the way down!

Stop pouring once the mold material has reached the height mark you made.

You can remove any large surface bubbles with a sharp pencil or the tip of your exact blade. Just be sure to wipe that tip off well with paper towel afterwards. Don't worry about the small bubbles. They're harmless!
The final thing to do is to move the mold board to a kraft paper covered, out of the way place to cure. Room temperature is the best for curing silicone. Do not try to cure silicone molds in temperatures below 65 degrees F / 18 degrees C.
Step 12: Freeing Your Mold & Model

Once your mold has cured for the amount of time specified in the instructions for your chosen material, it's time to remove the mold walls and free the mold and model!

Use an exacto knife to cut the corners of the corrugated plastic.
Peel back the walls and pry the mold off the mold board. It should come away fairly easily.
NOTE: Video is sped up 600x normal speed. :)


Flex the mold to pop out the model and TA DA!!! You are now the proud owner of a food-safe mold that you can use to make ice cubes, hard candy, jello, cakes, chocolate, and more!
But before the fun starts, we have to clean up first!

Use the metal scraper to remove the mold walls and hot glue from the mold board so it can be used again.

If you are extra tidy like, you can use an exacto blade to trim up the edges of the mold.
Now there's just one more thing to do before trying out your mold...
Step 13: Finding the Model's Volume

Before removing the clay from your model or disposing of it, let's find out what its volume is.
Why is this a good idea? Because a model's volume equals the amount of casting material you will need to make one of your pieces.
I'm going to be casting this mold in water to make ice, so knowing the volume of the model isn't imperative for me right now. Just in case I want to cast in another material in the future, that's expensive and requires mixing, I would want to know the volume ahead of time so I don't waste material.
This is a super easy process! Here's how it's done:

Using a measuring cup or bowl (depending on the size of your model – it needs to be completely submerged), fill the cup/bowl about halfway up with water so that the water is level with one of the bigger fluid ounce measurements (or whatever smaller unit of measurement you use for fluids). In my case the water sits at 16 oz. Write down this number on a notepad or the butcher paper.

Place your model into the water, letting it sink to the bottom. Take note of the new water level. Mine is now at about 18.6 oz. Subtract the original water level (16) from the new water level (18.6) and you are left with the fluid ounce volume of the model: 2.6 fl oz.
Step 14: Casting Your Mold

The world of casting is full of options. If you've made a food-safe silicone rubber mold like I have, you can cast:
- Ice
- Chocolate
- Cake
- Cookie dough
- Hard candy
- Jello
- Fondant
- Butter
- And more!
In the same food-safe mold and any other silicone mold, you can cast:
- Soap
- Wax
- Plaster
- Silicone rubber
- Resin
- Urethane
- Cement
- Low temp metals
- And more again!

Once you've decided what material you're going to cast in, step one is to give it a little bath to make sure there's no mold making debris left in it.

Fill it with your desired casting material (ice in my case).


Once the material has set (or froze), pop it out of the mold and you're done!
Step 15: Time to Get Quizzy With It
{
    "id": "quiz-1",
    "question": "Can you cast materials other than food in a food-safe silicone mold?",
    "answers": [
        {
            "title": "No",
            "correct": false
        },
        {
            "title": "Yes",
            "correct": true
        }
    ],
    "correctNotice": "That's correct! Any material that you can cast in non food-safe mold, can be cast in the food-safe version.",
    "incorrectNotice": "That's incorrect! Try again."
}
{
    "id": "quiz-2",
    "question": "What kind of disposable glove can NOT be worn when working with certain silicone rubbers?",
    "answers": [
        {
            "title": "Nitrate",
            "correct": false
        },
 	{
            "title": "Vinyl",
            "correct": false
        },
        {
            "title": "Latex",
            "correct":true
        }
    ],
    "correctNotice": "That's correct! Latex inhibits the curing of platinum based silicone rubbers.",
    "incorrectNotice": "That's incorrect! Try again."
}
Step 16: What's Next?
In the next lesson, I show you how to make flexible molds for models that have undercuts. You'll also see flexible sheet plastic in action, making a round mold wall!
Get ready for more mold making tips and fun!


