

Introduction: 3D Printed "Woven" Bookend and Bookmark


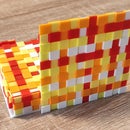

My recent experience with creating 3D-printed fabric-textured coasters has been extremely satisfying. I successfully achieved a pleasing and functional final result, reaffirming the immense creative potential of 3D printing. Inspired by the success of this project and the contest theme, I ventured into crafting unique bookends and bookmarks, drawing inspiration from the virtual weaving principles used in coaster creation.
I aimed to create objects with fine aesthetics and optimal structural stability. Additionally, I explored various 3D printing materials to enhance the durability of the bookends and bookmarks, while also creating a distinct surface topography with a unique visual and textural appearance. .
Beyond the functional and beautiful aspects, I hope this project will ignite a passion for 3D printing within others and encourage them to discover its vast potential. .
Supplies
All you need is a 3D printer and filaments of different colors (PLA or PETG).
However, you do need a high-quality printer because the first layer needs to adhere very well to the print bed.
You will also need the project files themselves, which you can find on Tinkercad.
The gray color elements are the ones to be printed. The assembled objects are only examples of how to make them.
Step 1: Printing
For the bookend:
- Print the base.
- Then print 4 strands and stacks of each of the 4 colors.
- Use a 0.2mm layer height and 25% infill.
For the bookmark:
- You only need 2 components: strands and stacks. Print 4 strands and 8 stacks of each of the four colors.
- The layer height was also 0.2mm and the infill 25%.
In the video in the next step, you can watch how I assembled the two objects.
A note.
I have no interest or intention to advertise a particular type of printer, but I must repeat that you need a good printer to print these projects. I recently bought (in January) a Bambu Lab A1 and I can say that I'm glad I did. Besides the fact that the prints are of very good quality, the adhesion of the first layer is excellent (and this is an express condition when printing both the strands and the stacks), but it also has an amazing printing speed, the prints are three times faster than on my "old" Creality CR-6.
Step 2: Assembly
Assembling the bookmark is not as straightforward as it might seem, but with a bit of patience and care, a professional-looking result can be achieved. :)
Step 3: Some Conclusions
- The entire project was edited 100% in Tinkercad, so you can change whatever you want.
- The bookmark is a little bit thick at 2.4mm and I'm thinking of experimenting with a 0.2mm nozzle to see how much I can thin the strands and stacks, now they are 0.8mm and 0.6mm thick respectively.
- You can experiment with different filament colors to create your unique bookmarks and bookends.
I hope you found this article useful and inspiring!
If you have any questions and doubts about this article, I will try my best to answer them.

Participated in the
Books and Bookshelves Contest


