

Introduction: Alien-Chestburster-Fossil


Hello again,
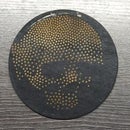
After seeing this very good template of a Chestburster on thingiverse, I couldn't get the idea out of my head to create a fossil. An Alien-Chestburster-Fossil.
I was able to gain some experience by casting with cement in previous projects. They all had one thing in common: the surface should be as smooth and perfect as possible. With this project, I wanted exactly the opposite. It should look as "real" as possible. Many failed attempts later, I am now at a point where it can be easily and cheaply recreated.
And before it starts:
this instructable takes part in the Concrete-Contest. If you think this is a worthy candidate for a nomination: please vote for me :) Thank you
Step 1: What You Need


- breathing protection
- latex gloves
- quick cement
- fine sand
- wood, or something else for the limitation of the casting mold
- Inexpensive silicone from the bathroom department in the DIY store - Silicone spray or something comparable
- Water
- Acrylic paint to colour the water
- colour powder / pigment (it helps)
- I still have a little coffee powder and a bag of tea mixed in to affect colouring and consistency.
- 3D printer or someone who prints the motif for you
- A few files or a Dremel / Multitool for postprocessing, if you like
When working with respiratory protection, you should either work outside or at least wear a real paint mask when working with cheap silicone, which is almost always based on vinegar.
When working with cement, a simple dust mask and silicone gloves are sufficient. Both materials are corrosive and accordingly harmful to health.
Step 2: 3D Printing


Thanks to the very good template, we hardly have to do anything with the data.
You could also use another program for scaling and cutting, but you can also do everything directly in the slicer.
- Import file
- scaling
- Rotate on the y-axis, now it's already perfectly centered on the z-axis
- Position on the print bed
Next we want to limit the print height, because the hill does not have to be printed completely. In Simplify you can set this in the Advanced tab. To determine the height, we first go to the print preparation. Here we can change the height with the sliders in the lower right corner. The value to be determined is then at the top left. Then we go out of the print preview and enter the determined value in the Advanced tab.
See pictures 5 and 6 for details.
It couldn't be simpler.
I've used PLA with 0.15 layer-height and 15% infill. Supports only at the mouth.
Step 3: Siliconmold


Do not use too much silicone to build the silicone mold. The goal should be a mold that is about 3mm thick.
(If the mold is too thick (picutre 2), PLA and silicone can no longer be separated.)
First you should determine where you will pour everything later.
So we need a board that is prepared with paint crepe. We then glue the 3D print onto the board with double-sided adhesive tape. Now the silicone syringe should be prepared. The opening of the nozzle should be cut quite big.
- Breathiing mask, gloves, silicone spray and water should be ready. 3D print fixed on the board?
Then put on breathing mask, gloves on, spray silicone spray on the print, apply silicone and press on the silicone with very WET silicon gloves.
That's quite a mess at first, but without water and silicone spray it won't work out.
I've tried - i've failed.
________________________________________________________________________
After 24 hours you can lift the mould for the first time. It will smell very strongly of vinegar. Leave the mould open with the 3D print for another 24 hours.
Then you can carefully remove the silicone. If you have the feeling that the silicone hasn't dried through yet, wait another 24 hours. And if it's still not firm enough, it's best to start all over again with less silicone.
The finished mold can then be slightly reworked. Just see if something catches your eye.
Step 4: Concrete


We'll have to build a mold for the cement first. You can screw everything tight or work with clamps. We don't create much pressure with the small amount of cement.
So first bring the silicone mould roughly to the desired position and then build suitable wood all around. Then fill the floor with sand. You should take a close look at the sand on the surface, as it will later form the upper layer of the fossil rock. If you like, you can also apply other things there. Some grass or e.g. something from a tea bag can bring a natural effect. If you are so far satisfied with it, then the silicone mould will be put into the sand. Do not exert too much pressure and make sure that no sand trickles into the mold. It is advisable to add silicone spray to the silicone mold beforehand.
In order to darken the cement, you should simply colour the water.
I've tried a lot to get a usable colour. Tea, liquid and only the contents of the bag, coffee in any form, soil from the garden, sand, acrylic paint, wood shavings, aluminum shavings ... everything has had a different effect. Only as soon as you add something to the cement, you change the chemistry. The result is almost always an unstable result. The cement becomes brittle. Except for sand.
My mixture now consists of some sand, some black acrylic paint, some black pigment paint and the contents of a tea bag. The tea bag and the sand go directly into the cement powder. The paint is mixed directly with the water. You should mix more coloured water than you will definitely need. The mixture leads to an easily workable cement, which is not too hard and gets a slightly dark, irregular colouring. If you want to mix cement that is very brittle or very easy to work with, then add some coffee powder. You would think that this smells good. Well... it does not. Everything is mixed approximately 1:10.
Silicone mold is in place and silicone spray was sprayed into the mold?
Then quickly mix the cement and pour. It's better to mix a little more liquid, so that all the details are reproduced. This is by far the most tricky part of the manual. You have to be fast, but not hectic. Work evenly and in one piece.
Then clean the tools and wait another 24 hours or more.
Step 5: Too Much Extras


At the beginning I wanted to get as dark a shape as possible. So I worked with a lot of paint.
That looked very good in a single experiment. But it's extremely unstable. As you can see on the pictures. Optically very good, technically completely unusable.
Step 6: Finishing


After 24 hours the wooden mould can be removed. Then it should dry open for another 24 hours.
Then carefully remove the silicone. The best part of the whole work :)
The different colours are a clear sign that the mould must now continue to dry open so that the rest of the water can evaporate.
If the colouring is relatively even, you can start with the reworking, as long as you are not 100% satisfied with the result. Here and there sand a little bit to remove the grooves of the basic shape.
Thank you for reading.
And, as noted above: if you think this instrunctable should be a candidate in the concrete competition, please vote for me :)

Runner Up in the
Stone Concrete and Cement Contest


