

Introduction: Medieval-Inspired Nerdy Gurdy


For as long as I can remember, the enchanting sounds of medieval music have always held a special place in my heart. The haunting melodies of minstrels and troubadours, accompanied by the mesmerizing drone of the hurdy-gurdy, transported me to distant times and far-off lands.
I've always been intrigued by the Nerdy Gurdy, a modern interpretation of the traditional hurdy-gurdy, particularly version 6.3.1, the latest at the time (fall of 2023). Its fascinating combination of history and innovation fueled my desire to undertake its construction.
Finally, after years of daydreaming and procrastination, I decided it was time to turn that longing into reality. I embarked on a journey to create my very own Nerdy Gurdy, armed with a passion for music and a deep desire to craft something unique.
After studying the plans and templates, I decided to make slight tweaks to the design, enhancing both its visual appeal and sound quality. These modifications have added a unique twist to my Nerdy Gurdy build, and I'll be sharing these customizations with you throughout this guide.
I'm excited to share my journey with you. Whether you share my love for medieval tunes, are a DIY enthusiast, or just looking for a fulfilling project. Let's dive in and make some music!
Supplies

Before we dive into the supplies you'll need for this Nerdy Gurdy project, I want to clarify that I chose not to use a kit. While Nerdy Gurdy kits are available and can be a great option for some builders, I opted to create a customized instrument. One of the modifications I made to the standard build was with the wheel assembly.
Unlike the typical Nerdy Gurdy build that uses a threaded rod for the wheel, I decided to take a different path. I found that threaded rods could occasionally lead to a slight wobble in the wheel, affecting the instrument's overall playability and sound quality. To address this, I decided to use a linear rail rod commonly found in 3D printers (that fits roller skate bearings perfectly). This adjustment not only eliminated the wheel wobble but also added precision and stability to the instrument which I found essential for achieving the best possible musical experience.
The following list of supplies and tools is tailored for those who, like me, are building the Nerdy Gurdy from scratch or making substantial modifications to an existing kit.
Materials:
- Baltic Birch Plywood:
- 3mm thick - The manual states 650 x 320 mm, but I was able to fit it into 480 x 250 mm
- 6mm thick - 650 x 320 mm
- However, it's possible to use a smaller sheet by rearranging the components and excluding the crank (which I did).
- Nerdy Gurdy Plans and Build Manual:
- Link to Nerdy Gurdy Plans
- Build manual
- Tuning Pegs:
- Purchase the narrowest ones available to reduce the need for widening the small holes in the NG design (I had to widen them). Be sure to bring along the peghole piece for reference.
- Strings: (a frequent source of confusion and frustration, these are the ones I used)
- Viola strings
- A string
- G string
- Classical guitar strings
- D string
- E string
- Tennis strings
- 1.35mm string
- 1.25mm string
- Bearings:
- 4x Roller skate bearings ( also called 608zz )
- I bought a package of 6 and selected the ones that rolled the smoothest.
- Rosin: (used to prepare the wheel and strings)
- I couldn't find liquid rosin for instruments where I live, so I had to make my own using:
- Hard rosin
- Isopropanol (frequently used for 3D printing)
- Wood Glue: High-quality wood glue for joining and securing various components. I used locally sourced "Herkules," which is similar to Elmer's glue.
- Linear rod for 3D printers
- 250mm long
- 8mm diameter
- 1x Threaded rod: (For crank)
- 65mm long
- 8mm diameter
- Guitar Tuners
- Hardware
- 10x M3-0.50-10mm bolts
- 50x M2.5-0.45x10mm bolts
- 4x M3 nuts
- 2x M3x20 bolts
- 2x sheet metal screw #4x1/2
- 7x sheet metal screw #4x5/8
- 4x sheet metal screw #4x3/4
- electrical ring connectors for string holders
- Wood Finish and dyes
- A finish such as varnish or oil to protect and beautify the wood.
- Green and mahogany wood dye (in my case)
- 3D printed parts
- Thingiverse link
Step 1: Laser Cutting Plywood


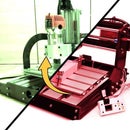
In my quest to craft a precise Nerdy Gurdy, I turned to the CNC laser cutter available at my local maker space for a number of compelling reasons. Firstly, it simplified the process, significantly saving time and effort. Secondly, it offered a level of precision that would have been challenging to achieve using traditional hand tools.
The plywood I initially used had a slight bend due to storage. To rectify this, I applied weights to straighten the plywood, ensuring that the parts were perfectly flat and ready for laser cutting. This correction enabled the CNC laser cutter to precisely cut the parts to their required dimensions. The remaining minor bends were subsequently addressed during the gluing process, resulting in flawlessly crafted components for our Nerdy Gurdy project.
It's important to note that while the CNC laser cutter was my chosen path, you can absolutely craft these components using ordinary hand tools if you prefer or do not have access to such machinery.
Step 2: Assembling the Gurdy's Body


In this pivotal chapter of my Nerdy Gurdy crafting journey, I begin assembling the central part of our musical masterpiece – the gurdy's body.
A distinctive feature of this assembly is my decision to temporarily leave the side that houses the wheel and its axis unglued. This choice allows for convenient access to make wheel adjustments. Given the critical role of the wheel in the gurdy's performance, it's best to leave this part unglued for now. During assembly, I relied on "Herkules" glue, a trusted PVA adhesive known for forming a strong and invisible bond between the plywood components. To secure the parts as the glue dried, I employed dumbbell weights.
It's important to note that while the design specifies the plywood sheets to be exactly 3mm thick, including the square holes, they may not always adhere to such precision and can vary slightly in thickness. Consequently, some sanding may be necessary to ensure that each piece fits together snugly.
Step 3: Staining the Body


I chose the sunburst staining effect for our Nerdy Gurdy's body because I've always been drawn to the beautiful patterns found on guitars. The sunburst effect, with its gradual color transition, adds a special touch to an instrument.
To create the mentioned sunburst staining effect on my Nerdy Gurdy's body, I began an intricate process of dying. This technique involved blending green and black ethanol-based wood dyes to achieve a visually striking transition of colors. First, I prepared the wooden surface by sanding it smooth, ensuring that the dye would adhere evenly.
The process began with a base coat of green wood dye, applied uniformly across the gurdy's body. This base served as a vibrant backdrop for the transition to darker hues. The heart of the sunburst effect lay in the delicate feathering of black wood dye from the outer edges of the body toward the center. Achieving a smooth and gradual transition demanded precision and patience, requiring a steady hand to create the iconic sunburst gradient. The outcome matched my vision perfectly, and I eagerly anticipated seeing the final product.
Step 4: Designing a Custom Flange in Fusion 360


During the Nerdy Gurdy build, I encountered a particular challenge: preventing the wheel's slipping on the smooth axis. Unlike the threaded rod, which provides a secure grip, the smooth axis presented the risk of the wheel slipping. To tackle this issue, I decided to design a custom flange using Fusion 360.
Additionally, when faced with the laser-cut wheel featuring a hexagonal hole, I had to find a solution. To ensure it remained securely attached to the smooth rod, I created a special part using 3D printing. This clever piece not only solved the issue of the wheel's compatibility but also provided a guide for drilling holes into the wheel.
Furthermore, I want to make your Nerdy Gurdy crafting journey as smooth as possible. That's why I've included all the necessary source files for download. You'll have easy access to the Fusion 360 design for the custom flange, the 3D model for the specialized component, and any other files required to replicate this aspect of the project. This way, you can dive right into crafting your own Nerdy Gurdy with confidence.
I collaborated with a local craftsman who, with plans exported from Fusion 360, expertly milled the custom flange on a lathe. However, during my ongoing exploration, I stumbled upon similar components on platforms like AliExpress. This piqued my curiosity, leading me to order one for comparison. I'll include a photo for reference, so you can see the alternative option I explored in our quest to refine the Nerdy Gurdy. I ended up using two of the locally made flanges.
But the story doesn't end here. The custom flange is just one piece of the puzzle that I've meticulously designed in Fusion 360. There's more to uncover, and I can't wait to share the other components that I made.
Attachments

Step 5: Crafting and Troubleshooting the Gurdy Wheel


Two 6mm laser-cut wheels needed to be glued together. I used a 3D-printed part as an alignment tool for this. After gluing, I focused on precision, making sure the outer edge was even by using a lathe. However, my first attempt at attaching veneer to the wheel didn't go too well. Despite my efforts, it didn't stay even. When the wheel rotated on the gurdy, it caused the strings to play unevenly, even though the wheel itself spun smoothly on the axis without any wobbling.
Undeterred, I embarked on a second attempt, this time with fresh veneer. Unfortunately, the result wasn't satisfactory either. Frustration set in, prompting me to turn to the wealth of knowledge on the internet. After some thorough research, I discovered an alternative solution: 3D printing the wheel. With newfound enthusiasm, I bought wooden filament and started crafting a new wheel for our Nerdy Gurdy.
Attachments

Step 6: Custom Wheel Design With Fusion 360


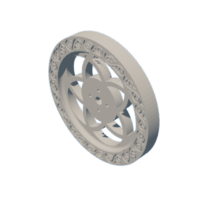
As I ventured into crafting the Nerdy Gurdy's wheel, I sought to infuse it with a touch of elegance and artistry. In the design process using Fusion 360, I decided to incorporate Gothic arches in the center of the wheel.
To further enhance the wheel's aesthetics, I opted for floral patterns along the edge. These delicate floral motifs added a touch of medieval-inspired theme to my Nerdy Gurdy. The Fusion 360 allowed me to bring these creative ideas to life.
However, I faced some challenges along the way. When I initially tried to dye the 3D-printed wooden wheel, it didn't turn out as expected (it looked more like it was stained unintentionally). So, I experimented by mixing the wood dye with brown and red acrylic colors to get the right shade. This process helped me achieve a color that matched the rest of the build.
I also needed to make sure the wheel rotated smoothly on the Nerdy Gurdy, so I used snap blades and carefully carved the wheel's edge while cranking the instrument. This step was crucial to ensure the wheel performed flawlessly.
Attachments
Step 7: Adapting the Linear Rod for Nerdy Gurdy's Axis


To transform the linear rod for 3D printers into the axis for our Nerdy Gurdy, I fashioned a special jig. This ingenious contraption was created using 3D printed parts, with bearings, later used in the gurdy itself, and an aluminum extrusion offcut. Its purpose? To ensure that the hole drilled into the center of the linear axis rod was perfectly perpendicular, without using the lathe. Its usage can be seen in the video.
Once the hole was in place, I tapped it, creating threads that allowed the crank to be securely fastened using screws. To further adapt the axis to our gurdy's unique needs, I employed a Dremel tool. I ground flat spots on the axis. These flat spots served a crucial role in allowing the crank to rotate the axis effectively and providing a secure grip for the grub screws in the custom flange.
Step 8: Custom S-Shaped Crank


I didn't like the original Nerdy Gurdy crank as much, so I decided to design my own (in Fusion 360 of course). The first step was careful planning to get the design just right, ensuring it had the curves and the right dimensions needed for the crank.
To create this custom crank, I partnered with my local maker space and used their CNC cutting capabilities. They took a half-centimeter thick aluminum sheet offcut and turned it into the elegant S-shaped crank I had envisioned. However, during this process, we faced an unexpected challenge. While the CNC machine worked its magic on the intricate curves, three 3mm CNC bits snapped. It made me wonder whether it was a coincidence or if the design's complexity pushed the tools to their limits. After the crank was CNC cut, I sanded the edges smooth, and tapped one hole with an 8mm metric tap, to accommodate for the knob shaft. The knob itself was also 3D printed from wooden filament.
Thanks to these adjustments, I was able to fit my custom wheel together with the flanges onto the axis. This assembly was then transferred into the instrument.
Source files for the crank are included in this chapter.
Attachments

Step 9: The Keybox and Elevation of Its Aesthetics


In this chapter of my Nerdy Gurdy journey, I ventured into the intricate process of constructing the keybox. One of the crucial aspects of this step was fitting keys into the keyholes so that they would function seamlessly. Again, this was because of the thickness of the plywood sheet not being precise enough. To achieve this, I dedicated a substantial amount of time to meticulously sanding the keyholes until the keys moved freely.
The journey didn't end there. After the keyholes were satisfactorily prepared, I decided to dye the keys themselves. I began by dying them in the same color as the body sunburn, so that would enhance their visual appeal. However, this step posed a unique challenge. Dying the keys caused them to undergo slight dimensional changes due to the absorption of the dye. Consequently, I had to spend additional time sanding the dyed keys to restore their original dimensions.
To make the keybox truly stand out, I chose to embellish the lid with a layer of 4mm leather. Before gluing the leather, I took the time to stamp intricate patterns of oak leaves and acorns onto it and applied the same colored dyes to bring those patterns to life. The result was a keybox lid that serves its functional purpose, but also looks stunning and complements the overall feeling of the instrument.
Step 10: Applying Rosin to the Wheel and String


In this step, I faced a challenge in obtaining the right type of rosin for my Nerdy Gurdy project. I could only find hard rosin intended for violins, so I decided to test its application on one of the test-fit wheels I had previously made. To my dismay, I discovered that applying the hard rosin caused damage and melting to the 3D-printed plastic wheel. This setback prompted me to search for an alternative solution.
After some extensive research and experimenting, I came across a promising solution. I learned that I could create a liquid rosin by dissolving the hard rosin in isopropanol. This revelation was a game-changer, and I was eager to try it out. With a bit of persistence and patience, I successfully applied the liquid rosin to the wheel and coated the test string, so the cotton would stick.
I learned about dissolving the rosin from SergioGonzález and his hurdy-gurdy YouTube channel, so shout out to him!
Step 11: Finalizing the Assembly and Testing the Wheel


I completed the remaining parts (except the body side panel) as per the build manual and glued them to the body. The guitar tuners were securely fastened, ensuring they were in the right position.
With everything in place, it was time for a crucial test. I selected one of the strings and threaded it through the instrument. With bated breath, I gave the wheel a gentle spin, eager to hear the sound it produced. This moment marked a significant milestone in my Nerdy Gurdy journey, as I witnessed the instrument come to life for the first time. It was an amazing feeling!
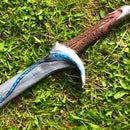
Step 12: Adding the Missing Body Side
I could now address the critical step of adding the missing body side to complete the instrument. This component is crucial for the overall structure of the gurdy. To enable it to bend into the distinctive shape of a gurdy, it features laser-cut lines across its surface. These lines didn’t fit my medieval theme at all and while many builders typically resolve this issue by painting over the lines, I opted to take an extra step by adhering veneer to conceal them. This decision would not only hide the lines but also add a touch of craftsmanship to the instrument's appearance.
Initially, I planned to use a combination of glues—a contact cement for the center of the veneer strip to ensure immediate adhesion and PVA glue for the edges, providing the option to sand down if needed. However, this approach didn't yield the desired results. I encountered challenges with adhesion when the glues were accidentally mixed and decided to go with contact cement only for the second side. This adjustment allowed me to successfully bond the veneer to the body side, achieving a clean and polished look for my Nerdy Gurdy.
Step 13: I Scavenged My Nerdy Gurdy Strings

Instead of purchasing brand-new strings, I recognized that I could repurpose broken strings from fellow musicians, for example, guitarists and violinists. These strings, while no longer suitable for their original instruments due to broking or minor imperfections, often retained sections that were in pristine condition when used in the Nerdy Gurdy. The unique strain points of these strings, stemming from their previous musical lives, made them perfect candidates for my project.
Step 14: Famous Last Words

Thank you again for joining me on this creative journey, and I hope you've enjoyed it as much as I have. If you have any questions or would like to share your own experiences, please don't hesitate to reach out in the comments section.
Additionally, I'd like to invite you to witness the Nerdy Gurdy come to life in action. I've documented the entire build process, complete with a sound test, in the video above. While the narration in the video isn't in English, I've included high-quality English subtitles (I made them with love) to ensure you don't miss a beat. Please feel free to watch the video and immerse yourself in the melodic world of the Nerdy Gurdy.
Thanks again, and happy crafting!

Judges Prize in the
Woodworking Contest


