

Introduction: Floating Tea Cup - Magnetic Tensegrity - 3D Printed


It has been some time since I have done something on the topic of tensegrity. I had the idea to make a cup and saucer float in connection with another project. But I discarded it. Now, because of the competition on the topic of "Magnets", would like to realize this idea!
The force of attraction of the two magnets in the middle of the two arcs - besides the three threads connecting the saucer and the base - build the tension in this object. It's a bit magical how the physical conditions create a tension that makes this object a unit - a perfect unit. At first sight a bit confusing ... you have to look twice to understand the principle.
Dimensions: Saucer Ø 118 mm, H approx. 160 mm, base Ø 80mm
Supplies


For this project you need:
- 3D printer
- filament
- nylon thread Ø 0.35 mm
- sewing needle
- superglue
- stop angle
- rubber canning ring
- scissors
- sanding paper
- file or/and cutter
- two 8 x 3 mm neodymium magnets. Unfortunately they are only available in larger quantities.
Nylon thread:
https://www.amazon.de/dp/B07HLF6SYY/ref=cm_sw_r_cp_tai_x1BUEbP9ACF3G
Magnets:
https://www.amazon.de/Neodym-Magnet-Stück-Magnete-Extrem/dp/B0187JGP1I/ref=sr_1_18?crid=24U72G6EWTWKC&keywords=magnete+3x8mm&qid=1684433280&sprefix=magnete+3x8%2Caps%2C118&sr=8-18
Step 1: Printing


First of all you should print:
- "Floating Tea Cup_cupwithsaucer.stl"
- "Floating Tea Cup_base.stl"
- "Floating Tea Cup_arc.stl" (2x)
- "Floating Tea Cup_magnetholder.stl" (2x)
Print settings:
- printer brand: Prusa
- printer: MK3s / MIni
- supports: No
- resolution: 0,2
- infill: 10%, arcs 30%
- filament brand: ICE; Prusa
- filament color: Wintershine White; Galaxy Black
- filament material: PLA
Remark: As all parts are designed to fit very precisely, it may happen that you have to rework one or the other part a bit with sandpaper and/or cutter due to different dimensional accuracy of the printers and the different behavior of the filaments.


Step 2: Glueing Arc to Base


After all the necessary parts are printed, you can now start assembling
You will need:
- "Floating Tea Cup_base.stl"
- "Floating Tea Cup_arc.stl"
- superglue
- stop angle
- file
To ensure a good fit, the fitting accuracy can be very tight ... better than too loose! It may be necessary to correct the fit with a file, cutter knife or sandpaper. Then apply superglue. For a correct alignment you should use a stop angle!
When inserting the arc, make sure the alignment is correct (see pictures). If the orientation is wrong, the holes for the nylon threads are not vertically above each other.
Wait a few minutes until the arc is absolutely fixed!
Step 3: Glueing Arc to Saucer


For the next step you need:
- "Floating Tea Cup_cupwithsaucer.stl"
- "Floating Tea Cup_arc.stl"
- superglue
- stop angle
- file
Proceed as in the previous step.
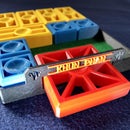
Step 4: Glueing Magnets to Holder


Now you need:
- "Floating Tea Cup_magnetholder.stl" (2x)
- two 8 x 3 mm neodymium magnets
- superglue
- file
Proceed as shown in the photos.
Important: When inserting the magnets, make sure that they attract each other!
Step 5: Glueing Magnetholder to Arcs


For the next step you'll need:
- the assembled base
- the assembled saucer with cup
- both assembled magnetholder
- stop angle
- superglue
- file
Before you glue the magnets in place, it can make insertion easier if you soften the edges of the end piece of the bow a little with a file.
Proceed as shown in the photos.
For a correct alignment you should use a stop angle!
In my case, the magnets could be inserted firmly enough without superglue.
Step 6: Preparing Stabilization Threads


For this step you need:
- ruler
- nylon thread Ø 0.35 mm
- scissors
- rubber canning ring
Cut three pieces of nylon thread at least 30 cm long. Tie a multiple knot at each end of the thread.
Then cut from a rubber canning ring three pieces of about 1cm in length.
Step 7: Assembly


We now come to the penultimate step. For the you need:
- the complete base
- the complete saucer with cup
- the prepared nylon threads
- 3 pieces of rubber canning ring
- sewing needle
- scissors
A big problem with tensegrity projects is always the correct tightening of the threads. Unfortunately, simply tying a knot in the "right" place doesn't work. Similar to my previous projects, I cut 3 pieces of rubber from a canning rubber ring.
Put both parts in front of you. Let the magnets attract each other!
First insert all 3 threads from the top of the saucer until you reach the knot.
Now turn the object upside down. Now pass the threads through the holes of the base. Then take the first thread, a sewing needle, put the thread through the eye and pierce one of the rubber pieces from the bottom as shown in the pictures. Pierce the needle through the rubber again from the top, not too close to the first piercing.
Do the same with the 2 other threads.
Note: if this does not provide enough resistance against the power of the magnets, one more stitch can be made, However, this complicates a little bit the mobility later when aligning.
Step 8: Adjustment


This is the most complicated part of the project! ... adjusting the threads is always a little tricky. It can drive you to despair! But then suddenly it works!
After all the threads are fitted with the "rubber adjuster", you can start adjusting them.
The little rubber pieces can be moved around.
When all 3 threads were almost evenly tightened, I raised the object upside down and started the "fine tuning". It took me several tries to get a good alignment! It's all about millimeters here. if the distance between the magnets is too small, they will inevitably attract each other. Finding the right distance takes a little patience!
The distance between the two magnets will be about 4-5mm with this type of magnets.
Place the small rubber pieces in the base so that they do not prevent the object from standing correctly.
When the fine-tuning is finished, you can cut off the protruding threads. But not too short, so that a readjustment remains possible.
It is always a fascinating experience when, after assembling all the parts, this tension suddenly is created when setting up the object: TENSEGRITY!
I advise against filling the cup with liquid. This would cause overload on the design and lead to disaster.
Step 9: Color Examples


Everyone has different filament colors at home, everyone has different color ideas ... here are a few color examples!
Step 10: Video
Towards the end of the video, it is shown how, when the teacup is set up, the attractive force of the magnets and the counter-pull of the nylon threads suddenly create a stable unit.

Participated in the
Magnets Contest


