

Introduction: Small Parts Routing Jig


Small parts can be difficult to route - do you awkwardly clamp it in a handscrew clamp and take it to the router table? Do you try and balance a plunge router on top of it? Worse is when you need a stopped dado for a floating panel and have to awkwardly plunge at the router table.
I've never liked plunging at the router table - it has always felt super sketchy to me.
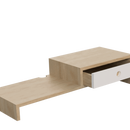
This simple jig creates a platform to rest a large router on, a nice square edge for the edge guide to reference off and securely locks the workpiece in place without clamps getting in the way, thanks to the wedges.
This is version two of the jig, with highly recommended reference pins and repeatable stops.
Tools
- Tablesaw
- Bandsaw
- Plunge Router w/ Edge Guide
- Drill press
Attachments

Supplies
- Plywood
- Hardwood (small pieces for wedges)
- T-Track (500mm), T-track Bolts (x2), Knobs
- Dowel (~5-6mm, brass, plastic or wood)
Step 1: Making the Jig


There is no one set of dimensions that'll work for all situations, but this has worked pretty well for me and my router (Bosch GOF 1600CE, aka the MR23 in North America). With that being said, see the attached PDF for the dimensions I used.
The use of 18mm (or 19mm or 3/4") plywood is because this is a small parts jig. If your parts are typically thicker than 18mm, you'll need to use thicker plywood (or multiple layers) as you want the router riding on the jig, not the work piece.
For the overall width, this can really be as long or short as you want. You need to accommodate the length of the workpieces you're working on, plus the diameter of your router if you want to reach the very edges of those pieces. I went with 500mm (~19.7") as its a nice round number and accommodates a variety of projects from small boxes to serving trays.
The fixed front fence is as wide as it is because that's half the diameter of my router base.
I rough cut a board to 500mm with my tracksaw, then took it over to the table saw to just make the rip cuts to give me the four parts. Thats all thats really needed
Step 2: T-Track


The T-Track gives you the ability to add stops and a reference point for your workpiece.
Those stops mean you don't have to eyeball the stopped dados and makes repeat setups for similar size parts much quicker.
Its always best practice to sneak up on a cut where possible. In this case, I made multiple test pieces on a scrap for the height of the dado (which should measure slightly more than the t-track itself).
Once that was set, I could make multiple passes to get the correct width on the actual work piece. The placement of the t-track (relative to the front or back) doesn't matter at all - it just needs to go all the way along the fixed fence.
Step 3: Reference Point

The reference point is so you can put multiple workpieces in succession that are guaranteed to be in the exact same place. Simply butt the workpiece up against the stop before clamping it in place, and if you've used the start/end stops you'll get the exact same groove.
These can be made from wooden, plastic or brass dowels. All are safe if a router bit happens to hit them.
To make the holes for the reference point, use an appropriate sized brad point bit to drill down 5mm. I made two rows (offset by 25mm), with each hole in a row being in increments of 50mm. This only needs to go down approx half the length of the base.
Step 4: Cutting the Wedges


Opposing wedges are strong, they're quick to lock in and knock out, unlike toggle clamps they don't get in the way of the workpiece and better than all of that...they're cheap/free!
Hardwood vs plywood/softwood?
For how little material you need, I'd recommend going with hardwood for durability. Softwoods will tend to dent and wear out, and plywood may not actually be as strong - remember, half the grain is going in the wrong direction!
The easiest way to make wedges is to cut them at the bandsaw, but it isn't overly critical how you cut them. I used an 8degree angle, but again, the dimensions don't really matter, so long as they fit on the jig.
Cams are better locking alternative?
One idea I have not experimented with is using a cam lock rather than wedges to provide the clamping action. This would be marginally more work to make, but should be easier to operate.
Step 5: Assembly


- The front fence can be screwed into the base. Make sure to countersink those screws so they sit below the surface.
None of the parts really need to line up with each other, however, the front fence should be either perfectly flush with the edge of the base, or overhanging slightly. The routers edge guide will reference up against this, and its better to reference off the front fence as thats the only part that needs to be parallel with itself. - The t-track can then be installed using #4 screws.
- The backstop can also be screwed into the opposite edge.
- At this point, one of the opposing wedges can be screwed down, hard up against the backstop. It isn't strictly needed to screw it down, but it does make it easier if one of the wedges doesn't move.
Step 6: Stops


On my router, the dust collection shroud sticks out the back. If you use anything thicker than about 14mm for the stop, it'll hit the dust collection rather than the router base.
In my case, I used 6mm plywood for the "start" stop, and 18mm for the "end" stop.
The stops need to be wide enough to accommodate your locking knob.
- Cut a piece of plywood down thats the width of the base. Drill a hole matching your t-track bolts (in my case, 5/16")
- To prevent needing two knobs/bolts, cut a shallow dado for a 'key' to be glued into. This key will sit in the t-track, preventing the stop from rotating.
- Shallow passes using a crosscut sled can create the dado, then thickness down some scrap hardwood to the dado.
- Glue the hardwood into the dado
- After the glue is dried, you may need to fine tune the depth of the key with a block plane.
Step 7: Usage


To use the jig
- Place the work piece between the fixed fence and moving fence - make sure to butt the workpiece up against a locating pin
- Use a mallet to force the two opposing wedges together
- Place your router on your workpiece, lower it to locate your start and stop points and adjust the stops accordingly
- Adjust your edge guide to get the placement correct
- Route away!
If you have multiples of the workpiece you're routing, you don't need to set the fences, as you can just butt the next workpiece up against the locating pin and the stops will stay the same relative to the new workpiece!
Step 8: Other Uses
While this is designed for routing, it also works great for sanding - sanding small parts with a random orbital sander is difficult as the workpiece is prone to dancing around. I made another copy of this jig, using 6mm (1/4") plywood instead, so that I could sand 9.5mm (3/8") thick parts!

Participated in the
Woodworking Contest


